Here are a few final thoughts on blogging:
Permissions
You can set up your blog to be available to the public or to only those you invite. The default setting is pubic. I don't mind public (so far) and it is nice for my family and friends to be able to visit without entering a password. If I get some strange comments, that may change. To change permissions click on the 'settings' tab and then 'permissions'.
Hyperlinks
You may be tempted to skip this but - hyperlinks can be fun. So try one! Suppose you found an exciting website or online picture or recipe that you just had to share with everyone. You can set it up so that your friends just need to click here to see it (click on the word 'here'). I did that by inserting a link. Here is what you do:
Open the website that you want to link and copy the URL address at the top of the window (highlight it and click 'edit' 'copy' or control C)
Go back to your post and edit it (read my last post if you don't know how to edit). Now highlight the text you want to use as a link
Click on the link icon at the top of your window (the green one with a chain link on it - to the right of the T)
A window will appear asking you to paste in the URL
Voila! all is done
Your friends are dazzled with your expertise.
Sharing your blog
Now that you have created the perfect blog, you need to share it. The easiest way is to open your blog, copy the URL address, and then paste it into a grand email announcement.

I'm a Granny. I have an iPhone, iPad, and an iMac. I guess I'm an iGranny. As I figure things out, I will share.
Sunday, September 30, 2007
Blogging - editing
No matter how careful you are in creating a post, when you look at the finished product, there is always some tweeking to do. For some reason, I haven't found a quick and easy 1 click path to edit a post - but I have found a tortuous multi click route. Please let me know if you find a better way. Here is what you do:
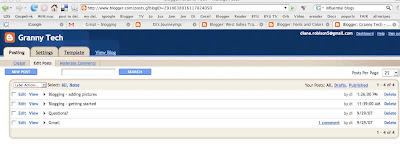
Click on the word 'customize' in the upper right of your window. In the new screen that appears, click on the tab at the top left that says 'posting' (be patient, it may take a minute for the screens to change). Then click on 'edit posts' (just below the tabs). Then click on the word 'edit' opposite the post you want to adjust. Then you can go in, fix anything, and republish.
I don't know of any way to rearrange your posts - the only option is to delete and put them back in the order you want.
You can play around with the look of your blog under the 'templates' tab. I recommend you do some exploratory clicking.
New Info!
I just found a way to do quick edits. You may need to set it up in your 'settings'. To find out how, click here. When it is set up a little picture of a pencil appears at the bottom of each blog. Just click on it to go to the editing mode. Now - why didn't I notice that earlier???
Blogging - adding pictures
To add pictures to your post, just click on the picture icon at the top of the window.
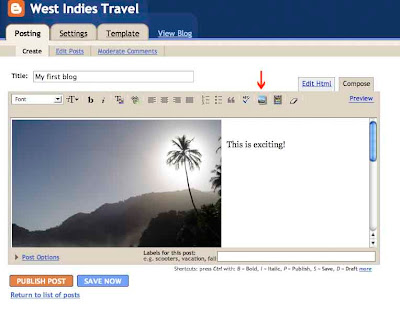
It will take you to a new window that looks like this:

Generally you will be adding an image from your computer. If you want one from the web, just open it in a new browser window, copy the address at the top of the screen, and past it into the window marked URL. To upload an image from your computer, click on browse and find it in your hard drive. Of course, it helps if your computer files are obsessively organized - maybe I will make a post on that sometime soon. Once you have located your image, you can choose the size and location. Then click on 'upload image' and just wait until it is done.
Next, return to your post and see how things look. This is when I have some difficulties. It seems that the uploader drops the image in wherever it wants - usually at the beginning of the post. It is possible to move images around but I have not found a way to do it with precision. Just click on the image so that little white squares appear in the corners and a black outline appears around the image. Then you can drag it around (I assume you now how to drag and drop - if not - let me know). It may take a few tries to get it to move where you want in relation to the text. You can also resize the image by dragging the corners. Hold down the shift key while resizing to maintain the image proportions. Sometimes smaller images are easier to move.
One more tip - you can upload multiple images at once (I think up to 5 or 6) by clicking on 'add another image'.
Blogging - getting started
My daughter, Jennifer, is setting up her first blog and asked for some help. So - I will take you step by step through settting up, posting, and editing a blog.
First of all - what is a blog?
I don't quite know how to describe it - maybe that is because blogs are so flexible. The name, I believe, comes from 'web log'. Blogs can be anything you want. They are a means to share text, photos, and video online. Many people use them as a kind of personal newsletter and they often have specific themes. Some are quite popular and have even 'shaped the course of human events.' In our family we use blogs to share news and photos. At first we had one extended family blog called Robisonshare. Right now we are setting up a blog for each of our five children (4 of whom are married with children of their own). This will make it better for our children to share their blogs with their inlaw family and friends without forcing them to wade through pictures of every Robison family event. My husband has a number of blogs set up. One of my favorites is his Family Home Evening Blog with stories and lessons for our children to share with our grandchildren. I have a personal blog plus Granny Tech.
Setting up a blog

Here is where I repeat my disclaimer - I am not an expert! In fact, I am a novice when it comes to blogging. I can get you set up with some basics, but we will be learning together. That said, the best place to get help is in Blogger help. To get there click on the 'B'ish looking icon at the upper left of your blog window and then on 'help' in the upper right. I highly recommend you browse through their help center.
Now - here are my thoughts on blogging
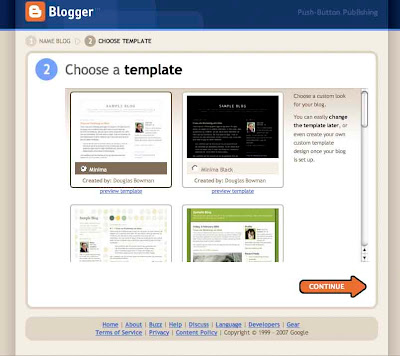
There are a number of services on the web that host and help create blogs for free. Since I am such a fan of Google, I use their blogging service called Blogger. To sign up for and create a blog, click on this link. You must have a google account in order to use this service. If you use Gmail, you already have an account. You will be guided through the simple process of selecting a title and an address for your blog. The final step is to select a template. Just pick one - you can always change it later.
Creating a Post
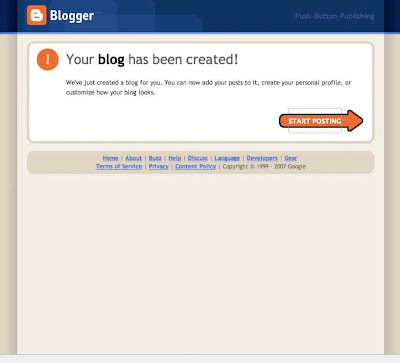

Once your blog is set up, click on 'start posting'. Then, you need to give your post a title and - start writing! You can insert photos, video, and links into your blog by clicking on the appropriate buttons at the top of the window. Since you will often want to add photos, I'll take you through that process in the my next post. When you have everything just right - click on 'publish post'. You can always make changes later - I'll guess I need to make a post on editing too.
Now that you are an expert, add more posts by clicking on 'new post' in the upper right part of your blog window.
First of all - what is a blog?
I don't quite know how to describe it - maybe that is because blogs are so flexible. The name, I believe, comes from 'web log'. Blogs can be anything you want. They are a means to share text, photos, and video online. Many people use them as a kind of personal newsletter and they often have specific themes. Some are quite popular and have even 'shaped the course of human events.' In our family we use blogs to share news and photos. At first we had one extended family blog called Robisonshare. Right now we are setting up a blog for each of our five children (4 of whom are married with children of their own). This will make it better for our children to share their blogs with their inlaw family and friends without forcing them to wade through pictures of every Robison family event. My husband has a number of blogs set up. One of my favorites is his Family Home Evening Blog with stories and lessons for our children to share with our grandchildren. I have a personal blog plus Granny Tech.
Setting up a blog


Here is where I repeat my disclaimer - I am not an expert! In fact, I am a novice when it comes to blogging. I can get you set up with some basics, but we will be learning together. That said, the best place to get help is in Blogger help. To get there click on the 'B'ish looking icon at the upper left of your blog window and then on 'help' in the upper right. I highly recommend you browse through their help center.
Now - here are my thoughts on blogging
There are a number of services on the web that host and help create blogs for free. Since I am such a fan of Google, I use their blogging service called Blogger. To sign up for and create a blog, click on this link. You must have a google account in order to use this service. If you use Gmail, you already have an account. You will be guided through the simple process of selecting a title and an address for your blog. The final step is to select a template. Just pick one - you can always change it later.
Creating a Post


Once your blog is set up, click on 'start posting'. Then, you need to give your post a title and - start writing! You can insert photos, video, and links into your blog by clicking on the appropriate buttons at the top of the window. Since you will often want to add photos, I'll take you through that process in the my next post. When you have everything just right - click on 'publish post'. You can always make changes later - I'll guess I need to make a post on editing too.
Now that you are an expert, add more posts by clicking on 'new post' in the upper right part of your blog window.
Saturday, September 29, 2007
Questions?
Do you have questions? I would be happy to respond to them in this blog. Let me know what computer issues you are struggling with by adding a comment to this post (click on the word 'comments' at the bottom of this post). I plan, when time allows, to add posts about saving and emailing photos (picasa), making a homepage (igoogle), making your own blog (blogger), downloading free audio (itunes), and other tools that I have come across that help me have fun and be productive.
Gmail
I love Gmail!
Gmail is free!
It has certain limitations - mainly that messages can only be read and composed while your computer is connected to the internet. But the free storage and the search capacity are amazing. I actually have a number of accounts. I have my main one as well as a secondary one that I use for all online purchases and registrations. That one fills up constantly with junk mail but I only check it every few weeks. This keeps my main account nice and clean. I have also created accounts for special purposes when I knew I would be collecting lots of messages with hefty attachments (for some of my research projects). I keep a careful record of all Gmail account names and passwords on a Word document stored in my computer in a folder called, not surprisingly, 'computer info'.
If you don't have a Gmail account click here (just click on the word 'here') to sign up.
There are lots of things you can do with Gmail. Here are a few of my favorites:
Search
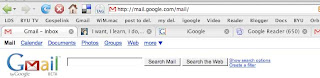
If you are trying to find an email just recall a word or two from it and type them into the search window. Then hit return or click on 'Search Mail'. A list of messages containing those words will appear. You can also search by a person's name if you want a quick way to find their emails.
Labels
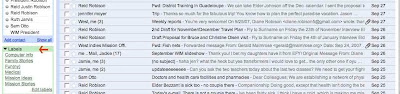
Labels are kind of like file folders. Imagine setting up a file for certain emails you may want to access later. You can do that by creating labels. The nice thing about labels as opposed to folders is that you can put the same email into multiple imaginary folders by giving it more than one label. Because of the great search capacity in Gmail, you don't need to give every message a label. Just think about what groups of emails you may want to retrieve. You can see (above) the current labels I have in my Gmail - or maybe you can't - the image is very small. I am currently using: Computer info, Family stories, Fun(ny), Medical, Mission ideas, and Mission Stories. I expect my label list will grow as time goes on.
It is easy to create and apply labels.

To get started just select a message you want to label by clicking in the little white box to the left of the sender's name. A checkmark will appear. Then click on the tiny downward facing arrow to the right of the window near the top of your screen that says 'more actions'. A drop down menu will appear. Click on 'new label' and type in a title for that label. The label will automatically be applied to the message you selected and in the future it will appear as a label in your 'more actions' menu. Later, when you have another message you want to label. Just select the message, click on 'more actions' and then click on the label title. It is also possible to remove labels and edit them. The Gmail help link (upper right hand corner) is a great place to learn more.
Have fun searching and organizing!
Subscribe to:
Posts (Atom)