She (he?) provided a simple solution to a frustrating problem

I'm a Granny. I have an iPhone, iPad, and an iMac. I guess I'm an iGranny. As I figure things out, I will share.
Tuesday, September 30, 2014
Lacie hard drive won't mount
Thank you Diannetrussell!
She (he?) provided a simple solution to a frustrating problem
She (he?) provided a simple solution to a frustrating problem

Tuesday, December 31, 2013
Finding Pantone Colors


I design fabrics for Taylor Joelle Designs and we often need to give exact pantone colors to the printers.
I usually start with iPad sketches in custom colors (like my little hedgehog above). Then we pay someone to make it a pattern (don't have that totally figured out yet).
The problem is - how do I determine Pantone colors from one of my sketches?
I found a simple method here in Planet Photoshop - thank you!
First import the image into Photoshop.
Then...
First import the image into Photoshop.
Then...
Here's their tip:
Ever wanted to know what a specific color would be in a specific library (like Pantone)? Select the color with the Eyedropper tool (I). Click on your Foreground color swatch to open the Color Picker. You will notice there is a button for Color Libraries. Click on that, and it will bring you the approximate color swatch for whatever library you chose.I used the Pantone solid coated library to generate my colors - it worked great.
And this Pantone color finder site is a great place to check your findings.
Sunday, April 21, 2013
Perfect iPad Purse

If you'd like to carry your iPad in style - here is the bag for you!
The obsessively organized, iPad purse is now available at clydebags.com
The Clyde iPad purse is a satchel style bag in two color versions - bright red and turquoise.
The lining is a gorgeous vintage typewriter print from London designer, Rachel Cave.

Important features:
- top quality, weather resistant polyurethane exterior (looks fantastic, lasts forever)
- fur lined zip pocket on the back of the bag - sized perfectly for an iPad or other similar sized tablet

- easy access back zip pocket with iphone sleeve and space for other frequently used items

- adjustable shoulder strap and convenient 'grab' handle
- two compartment interior
- kindle or small tablet pocket
- private interior zip pocket
- additional interior pockets
- key hook

Tuesday, September 4, 2012
Playing with fonts
Have you ever wanted to pick the perfect font for your text?
I have. Right now I'm designing a logo for my new iPad bag company - Clyde.
Here's a fun website that let me see "clyde" in every font installed on my computer
wordmark.it
Here's another question - What if you want more fonts?
Here are a few places to find free fonts (thanks to Jad Limcaco for this collection):

One last question to address - How do I install a new font once I download it?
so easy!
Now, if you unfortunately have a PC rather than a mac - here's a link on how to install fonts (it's not nearly as simple):
http://www.wikihow.com/Install-Fonts-on-Your-PC
I have. Right now I'm designing a logo for my new iPad bag company - Clyde.
Here's a fun website that let me see "clyde" in every font installed on my computer
wordmark.it
Here's another question - What if you want more fonts?
Here are a few places to find free fonts (thanks to Jad Limcaco for this collection):
- The League of Moveable Type
This website has a great collection of free fonts including League Gothic, which has really become popular. I would suggest following them on Twitter or subscribing to their feed as well. - Lost Type
I just recently stumbled upon this website and they have lots of great fonts that are available for download. Although the fonts are free, I’m sure they would love your support so maybe donate a few dollars to them. - Font Squirrel
This is a great website with tons of high-quality fonts that are mostly @font-face compatible. You can also download their fonts as @font-face kits and they also have a @font-face generator. This is definitely a great resource. - Impallari
There are only a few fonts available for download on this site, but they are really nice. Lobster is a great font that has gained popularity and has even been included in the Google Font directory. - FontFabric
They have a great freebie section with lots of nice fonts to download. - DaFont
There are a lot of fonts on this site. Sure, not all of them are the best quality, but I usually go to this site if I’m looking for a font to use with a particular look or theme. For example, if I wanted to use an Indiana Jones font or some other type of movie font, I would just do a search on this site.
One last question to address - How do I install a new font once I download it?
- Unzip your font folder by double clicking on the downloaded file (in your downloads folder)
- Open the folder
- Double click on the font file - it has the .ttf extension
- The font will open in a new window. Click "install font" and you are done.
so easy!
Now, if you unfortunately have a PC rather than a mac - here's a link on how to install fonts (it's not nearly as simple):
http://www.wikihow.com/Install-Fonts-on-Your-PC
Wednesday, March 9, 2011
Searching within a YouTube channel
I had to solve this challenge today: I wanted to send a link to a YouTube video within it's channel. This avoids all the sometimes scary video links that show while you are in the general YouTube site. This particular channel had hundreds of videos. The general YouTube search window would not open the video within the channel. How to find the link I wanted?
What is a YouTube Channel?
A YouTube channel is simply an account set up by an individual or an organization to host videos. You can subscribe to channels and they will show up when you sign in to YouTube.
What is a YouTube Channel?
A YouTube channel is simply an account set up by an individual or an organization to host videos. You can subscribe to channels and they will show up when you sign in to YouTube.
How do I search within a channel?
At first glance there doesn't appear to be a way to do that. Here is a hidden trick:
Open the channel's homepage. Click on "Uploads" at the top of the window and a search option will appear at the right - just above the sidebar of videos.
Open the channel's homepage. Click on "Uploads" at the top of the window and a search option will appear at the right - just above the sidebar of videos.
To share a link, click on "Share" and the video's URL will appear.
Here's something strange - you can't get the code to embed a video while you are within a channel. You have to view the video outside the channel in the general YouTube site. Use the share link as the web address or the general search window to get there. In the general YouTube site an "Embed" button is available below the window. Click on it to get the embed code.
Saturday, February 12, 2011
How the Internet Began
How the Internet started:-
A revelation with an Incredibly Big Message (IBM):
Well, you might have thought that you knew how the Internet started,
but here's the TRUE story ....
In ancient Israel, it came to pass that a trader by the name of
Abraham Com did take unto himself a young wife by the name of Dot.
And Dot Com was a comely woman, broad of shoulder and long of leg.
Indeed, she was often called Amazon Dot Com.
And she said unto Abraham, her husband, "Why dost thou travel so far
from town to town with thy goods when thou canst trade without ever
leaving thy tent?" And Abraham did look at her - as though she were several saddle bags short of a camel load - but simply said, "How, dear?"
And Dot replied, "I will place drums in all the towns and drums in
between to send messages saying what you have for sale, and they will reply telling you who hath the best price. The sale can be made on the drums and delivery made by Uriah's Pony Stable (UPS)."
Abraham thought long and decided he would let Dot have her way with
the drums. The drums rang out and were an immediate success.
Abraham sold all the goods he had at the top price, without ever having
to move from his tent.
To prevent neighboring countries from overhearing what the drums were saying, Dot devised a system that only she and the drummers knew. It was called Must Send Drum Over Sound (MSDOS), and she also developed a language to transmit ideas and pictures: Hebrew To The People (HTTP)
But this success did arouse envy.
A man named Maccabia did secrete himself inside Abraham's drum and began to siphon off some of Abraham's business. But he was soon discovered, arrested and prosecuted for insider trading.
And the young men did take to Dot Com's trading as doth the greedy horsefly take to camel dung. They were called Nomadic Ecclesiastical Rich Dominican Sybarites, or NERDS.
And lo, the land was so feverish with joy at the new riches and the deafening sound of drums that no one noticed that the real riches were going to that enterprising drum dealer, Brother William of Gates, who bought off every drum maker in the land. And he did insist on drums to be made that would work only with Brother Gates' drum heads and drumsticks.
Lo, Dot did say, "Oh, Abraham, what we have started is being taken
over by others!" And as Abraham looked out over the Bay of Ezekiel, or eBay as it came to be known, he said, "We need a name that reflects what we are."
And Dot replied, "Young Ambitious Hebrew Owner Operators."
"YAHOO," said Abraham. And because it was Dot's idea, they named it YAHOO Dot Com.
Abraham's cousin, Joshua, being the young Gregarious Energetic Educated
Kid (GEEK) that he was, soon started using Dot's drums to locate things around the countryside.
It soon became known as God's Own Official Guide to Locating Everything (GOOGLE)
And that is how it all began.
Source of this information? The internet, of course.
A revelation with an Incredibly Big Message (IBM):
Well, you might have thought that you knew how the Internet started,
but here's the TRUE story ....
In ancient Israel, it came to pass that a trader by the name of
Abraham Com did take unto himself a young wife by the name of Dot.
And Dot Com was a comely woman, broad of shoulder and long of leg.
Indeed, she was often called Amazon Dot Com.
And she said unto Abraham, her husband, "Why dost thou travel so far
from town to town with thy goods when thou canst trade without ever
leaving thy tent?" And Abraham did look at her - as though she were several saddle bags short of a camel load - but simply said, "How, dear?"
And Dot replied, "I will place drums in all the towns and drums in
between to send messages saying what you have for sale, and they will reply telling you who hath the best price. The sale can be made on the drums and delivery made by Uriah's Pony Stable (UPS)."
Abraham thought long and decided he would let Dot have her way with
the drums. The drums rang out and were an immediate success.
Abraham sold all the goods he had at the top price, without ever having
to move from his tent.
To prevent neighboring countries from overhearing what the drums were saying, Dot devised a system that only she and the drummers knew. It was called Must Send Drum Over Sound (MSDOS), and she also developed a language to transmit ideas and pictures: Hebrew To The People (HTTP)
But this success did arouse envy.
A man named Maccabia did secrete himself inside Abraham's drum and began to siphon off some of Abraham's business. But he was soon discovered, arrested and prosecuted for insider trading.
And the young men did take to Dot Com's trading as doth the greedy horsefly take to camel dung. They were called Nomadic Ecclesiastical Rich Dominican Sybarites, or NERDS.
And lo, the land was so feverish with joy at the new riches and the deafening sound of drums that no one noticed that the real riches were going to that enterprising drum dealer, Brother William of Gates, who bought off every drum maker in the land. And he did insist on drums to be made that would work only with Brother Gates' drum heads and drumsticks.
Lo, Dot did say, "Oh, Abraham, what we have started is being taken
over by others!" And as Abraham looked out over the Bay of Ezekiel, or eBay as it came to be known, he said, "We need a name that reflects what we are."
And Dot replied, "Young Ambitious Hebrew Owner Operators."
"YAHOO," said Abraham. And because it was Dot's idea, they named it YAHOO Dot Com.
Abraham's cousin, Joshua, being the young Gregarious Energetic Educated
Kid (GEEK) that he was, soon started using Dot's drums to locate things around the countryside.
It soon became known as God's Own Official Guide to Locating Everything (GOOGLE)
And that is how it all began.
Source of this information? The internet, of course.
Thursday, February 10, 2011
Showing iPhone/iPod/iPad Video through TV
If you are a teacher or trainer (or mother or grandmother), it's wonderfully handy to play the video content collected on iPhones/iPods/iPads through a TV. I carry a collection of family and teaching clips on both devices, just in case....
The Apple Store offers two different cables for this purpose: Composite Cable and Component Cable. Current cost for each: $39.99. I'll do my best to explain the difference.
Apple Composite Cable

This cable has three TV input connectors. It connects from your device's dock connector, to a TV's composite video (yellow) and two audio (red, white) ports (small round inputs). It also has a USB connector that you can plug into a power source such as a computer or power adaptor (optional to use - it can run on battery quite a while).

This cable has five TV input connectors. It connects from your device's dock connector, to a TV's three video ports and two audio ports. The three video ports support HDTV (high definition). It also has a USB connector for optional power sources.
So which cable do you need?
The Apple Store offers two different cables for this purpose: Composite Cable and Component Cable. Current cost for each: $39.99. I'll do my best to explain the difference.
Apple Composite Cable
This cable has three TV input connectors. It connects from your device's dock connector, to a TV's composite video (yellow) and two audio (red, white) ports (small round inputs). It also has a USB connector that you can plug into a power source such as a computer or power adaptor (optional to use - it can run on battery quite a while).
This cable has five TV input connectors. It connects from your device's dock connector, to a TV's three video ports and two audio ports. The three video ports support HDTV (high definition). It also has a USB connector for optional power sources.
To see exactly which iPhones and iPads are compatible with the devices, click the titles above to view them in the Apple Store.
So which cable do you need?
That depends on what sort of TVs you will be using. Older TVs with inputs usually have the three inputs available on the composite cable. Newer HDTVs often have both types of input. Some of the newest HDTVs only have the five component inputs.
To be absolutely sure - have both. However I only have the composite cable and I've been able to use it in all situations (so far). For now, that's the one I recommend.
To be absolutely sure - have both. However I only have the composite cable and I've been able to use it in all situations (so far). For now, that's the one I recommend.
These cables are available from non Apple sources are well. Ask for them at an electronics store or search online.
Thursday, February 3, 2011
Yes You Can!
I'm reviving Granny Tech!
We are going be totally tech savvy.
Our motto will be - Yes You Can!
Here's a few videos to get you started:
We are going be totally tech savvy.
Our motto will be - Yes You Can!
Here's a few videos to get you started:
Don't ever estimate the ability of a motivated woman:
A look at the future:
Hang in there! You can do it.
And here are some (hopefully) confidence building learning statements:
“We are what we repeatedly do. Excellence then, is not an act, but a habit.”
Aristotle
We are continually faced with a series of great opportunities brilliantly disguised as insoluble problems.
John W. Gardner
-
The beginning of knowledge is the discovery of something we do not understand.
Frank Herbert
I have not failed. I've just found 10,000 ways that won't work.
Thomas A. Edison
Computers make it easier to do a lot of things, but most of the things they make it easier to do don't need to be done.
Andy Rooney
No one who cannot rejoice in the discovery of his own mistakes deserves to be called a scholar.
Donald Foster
You can teach a student a lesson for a day; but if you can teach him to learn by creating curiosity, he will continue the learning process as long as he lives.
Clay P. Bedford
It's what you learn after you know it all that counts.
Attributed to Harry S. Truman
Give me a fruitful error any time, full of seeds, bursting with its own corrections. You can keep your sterile truth for yourself.
Vilfredo Pareto
Man's mind, once stretched by a new idea, never regains its original dimensions.
Oliver Wendell Holmes
You learn something every day if you pay attention.
Ray LeBlond
Learning is a treasure that will follow its owner everywhere.
Chinese Proverb
All the world is a laboratory to the inquiring mind.
Martin H. Fischer
I am always ready to learn although I do not always like being taught.
Winston Churchill
And a few statements on technology:
This is perhaps the most beautiful time in human history; it is really pregnant with all kinds of creative possibilities made possible by science and technology which now constitute the slave of man - if man is not enslaved by it.
Jonas Salk
One machine can do the work of fifty ordinary men. No machine can do the work of one extraordinary man.
Elbert Hubbard, The Roycroft Dictionary and Book of Epigrams, 1923
If it keeps up, man will atrophy all his limbs but the push-button finger.
Frank Lloyd Wright
Technology... the knack of so arranging the world that we don't have to experience it.
Max Frisch
And here are some (hopefully) confidence building learning statements:
“We are what we repeatedly do. Excellence then, is not an act, but a habit.”
Aristotle
We are continually faced with a series of great opportunities brilliantly disguised as insoluble problems.
John W. Gardner
-
The beginning of knowledge is the discovery of something we do not understand.
Frank Herbert
I have not failed. I've just found 10,000 ways that won't work.
Thomas A. Edison
Computers make it easier to do a lot of things, but most of the things they make it easier to do don't need to be done.
Andy Rooney
No one who cannot rejoice in the discovery of his own mistakes deserves to be called a scholar.
Donald Foster
You can teach a student a lesson for a day; but if you can teach him to learn by creating curiosity, he will continue the learning process as long as he lives.
Clay P. Bedford
It's what you learn after you know it all that counts.
Attributed to Harry S. Truman
Give me a fruitful error any time, full of seeds, bursting with its own corrections. You can keep your sterile truth for yourself.
Vilfredo Pareto
Man's mind, once stretched by a new idea, never regains its original dimensions.
Oliver Wendell Holmes
You learn something every day if you pay attention.
Ray LeBlond
Learning is a treasure that will follow its owner everywhere.
Chinese Proverb
All the world is a laboratory to the inquiring mind.
Martin H. Fischer
I am always ready to learn although I do not always like being taught.
Winston Churchill
And a few statements on technology:
This is perhaps the most beautiful time in human history; it is really pregnant with all kinds of creative possibilities made possible by science and technology which now constitute the slave of man - if man is not enslaved by it.
Jonas Salk
One machine can do the work of fifty ordinary men. No machine can do the work of one extraordinary man.
Elbert Hubbard, The Roycroft Dictionary and Book of Epigrams, 1923
If it keeps up, man will atrophy all his limbs but the push-button finger.
Frank Lloyd Wright
Technology... the knack of so arranging the world that we don't have to experience it.
Max Frisch
Wednesday, August 26, 2009
Keyboard shortcuts - learn them!

These are the basics that you should use all the time:
- CTRL+C: Copy
- CTRL+X: Cut
- CTRL+V: Paste
- CTRL+Z: Undo
Copy - picks up whatever you highlighted and stores it on a clipboard so you can paste it in a different place or program. For example, you could copy some text from a website and paste it into a Word document (think C=copy)
Paste - of course, puts whatever is on your clipboard into the location you select (think V=points down to where you want to put stuff).
Cut - Copies AND REMOVES whatever you select and puts it on a clipboard so you can paste it (think X=scissors).
Undo - undoes the last thing you did (think Z=zzzzzz oops, I fell asleep). You can Undo multiple times to keep stepping backwards through the actions you want to remove. This even works when writing emails - helpful because there's no obvious undo command.
I can't tell you how many times I use CTRL+Z!
Of course there are many more keyboard shortcuts. Here are official lists of shortcuts for Windows and Macs.
Why don't you try learning one per month?
Tuesday, August 25, 2009
Blogger pictures - my way
I've had a number of people ask me how I get nice big pictures like these in my blogs.
I will show you.
In order for a picture to show up on your blog it must be hosted somewhere on the web. So that's the first step. Once it's on the web, you need to get it into your blog in the size and position that you prefer. So it's really a two step process. I will explain both.
Uploading a picture to the web
Blogger Button
Blogger has an upload button (see below) that actually takes care of both steps. It lets you upload a photo from your computer and place it right into your blog - but I don't like it. It just doesn't give me enough options.

The only picture sizes available using this method are:
small (200 px)

medium (320 px)

or large (400 px)

Picture sizes are limited and you can see how they end up in random places making it hard to allign text with photos.
Picasa Web Albums
I like to have more control so I use a different method. I upload my photos to a Picasa Web Album and paste links from there into my blogs. It's funny because the Blogger button actually puts photos into their own special Picasa web album created just for your blog.
Creating a Picasa Web Album
In order to use create a Picasa Web Album you first need to sign up. Go to the Picasa Web Album website and sign in using your gmail address and password. If you don't have one, shame shame, it is my favorite email service. You can always sign up free for a gmail account.
Once you have signed in, you will be taken to a screen like this:

There are two ways to get photos into your online albums:
The "Launch Picasa" button will take you to the Picasa application on your computer, assuming you have it installed and are using it. It's a great program for organizing photos and you can download it for free. With that program installed, you can upload your photos directly from Picasa on your computer to Picasa Web Albums. I don't use Picasa on my computer so I'm afraid I'm not an expert on this method.
The second option is the "Upload" button. That will take you to a screen like this:

Your window may be empty but, as you can see, I have quite a few albums already created. I like to organize them by month or special collection. You have the option to upload photos to an existing album (click on the album you want to use and then 'select album') or you can create a new album by clicking on that phrase at the top of these screen.
Once your album is selected or created, you will be taken to this screen.

You can upload up to 5 photos at once by clicking on the 'browse' button and navigating to the picture on your computer (nicely organized into folders I hope). When you have selected your photos, click 'start upload' and they will appear in your album.
If you use a mac computer, there is still an easier way to upload photos that I prefer. Download the Picasa Web Album Uploader for Mac. With this application, you can upload many pictures at once by dragging them into the uploader window. It looks like this:

You can select an album or create a new one. You can designate upload size. I use the "Faster upload (1000px) option" because that is plenty big for blogging.
So those are a few options for getting pictures hosted on the web. Next we need to get them into our blogs.
Adding a Picture to Blogger
Open up your Picasa Web Album and you will see all of your photo albums
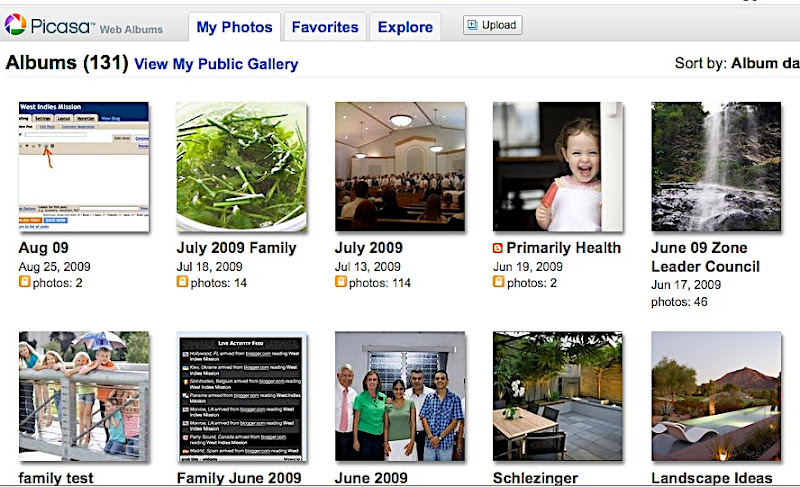
I guess I have quite a few (131!). Picasa gives you a little over 1 GB of photo storage free. If you limit your uploads to the 1000px version - that ought to last quite a while. Picasa offers an upgrade for a fee that gives 20 GB of storage.
Select the album you want and you will see your photos
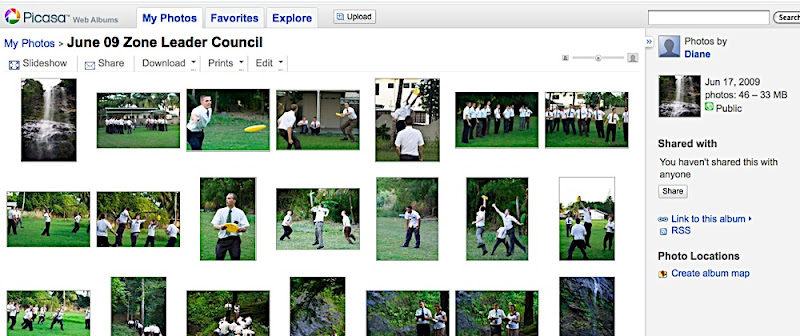
Now select the photo you want and you will see this screen

Selecting the code
The important information is off to the right - click on the phrase 'link to this photo' and a few windows will open up just below that say 'link' and 'embed image'.
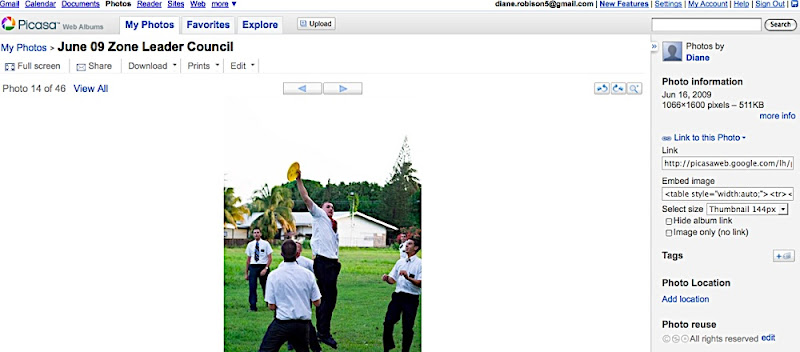
We are interested in embedding. Right below 'embed image' is the code that you need to paste into your blog. But first we need to make a few selections.
Select size by clicking on the little arrow to the right of the pull down window. You can choose thumbnail (144px), small (288px), medium (400px), or large (800px). You may ask why the jump from 400 to 600? I wonder that too - especially since 600px is the size I prefer to use in blogging! Standard Blogger templates are about 800 pixels wide. I use a 'stretch' template that stretches to the width of the computer window. That's nice for bigger pictures. If you use a standard blogger template, medium (400px) images will be about right. If you use a stretch template 600 px is perfect but you will need to customize the embedded code to get it. I'll show you how to do that later (don't worry - it's not too difficult!). Meanwhile - here is what the four size options look like.
thumbnail (144px)

small (288 px)

medium (400px)

large (800px)

and here's my customized 600 px size - perfect, isn't it?
You also have some choices to make about links. The choices are right below your 'embed image' code. I always click the box 'hide album link'. This just avoids extra text in the blog and makes it easier to customize photo size. The other box 'image only, no links' gives you a choice about what will happen when someone clicks on the picture in your blog. I leave it blank. Here is what my choices look like:
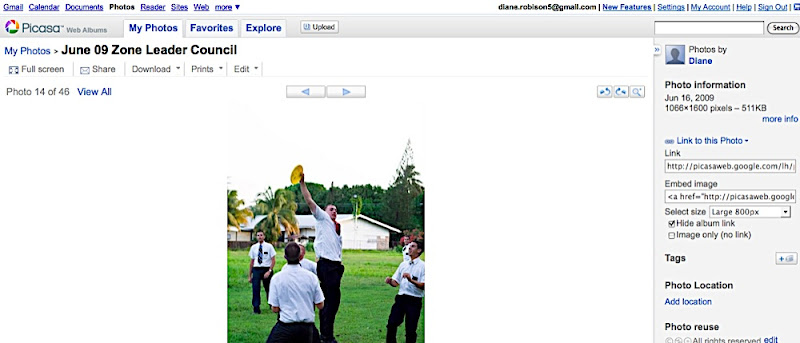
Now that you have everything selected, let's get the code. This is quite easy. Just click anywhere inside the box under 'embed image'. The code will all turn blue meaning it's been selected. If that doesn't work, just drag and highlight all the code. Now copy it - control 'C' or go to 'edit' at the top of the screen and then 'copy'.
The code is now on your 'clipboard' and we are ready to paste it into your blog. I'll show you how to do that step by step in a sample blog post.
Pasting the code
Here's some text

To add a photo, put your cursor where you want it and paste - Control 'V' or 'Edit' 'Paste'. Here's the code.

But wait - that doesn't look like a picture!
That's OK - you just need to toggle back and forth between the two tabs at the top of your blogger window. They say 'Edit Html' or 'Compose'. In Blogger, it doesn't matter which you use to paste the code. But to see the picture you must click on the 'Compose tab' or, if you are already in Compose, click 'Edit Html' and then back to 'Compose'.
And Ta Dah! Your picture appears

Isn't that easy?
Here's what's really nice. If you want to move your picture, you can go into 'Edit Html' mode, copy the code and paste it anywhere in your blogger window.
Customizing picture size
Now - here is the slightly tricky part - customizing the size. I almost always want to use a width of 600px. So here's what I do. I paste in the large size picture (800px) and then modify the code to make it slightly smaller. Make sure you can see the embeded code. You may need to click on the 'Edit Html' tab.
Let's take a closer look at the code

The arrow is pointing to a spot right after .jpg"
That's where you need to do a little editing. Type in width=600 (or whatever size you want) so it looks like this. I like to put a space on either side of my typing just so everything is easy to see.

Now, when you click the 'Compose' tab to see your picture - it will be the perfect size! That's not too difficult, right? I use this all the time. I like 'width=600' for horizontal pictures and 'width=400' for vertical. That keeps things nice and uniform.
That's what I just did for this blog - went into all my code and changed the widths to 600.
I hope this somewhat lengthy blog post helps. If you have questions or suggestions on this topic, please add a comment and I will address them.
I will show you.
In order for a picture to show up on your blog it must be hosted somewhere on the web. So that's the first step. Once it's on the web, you need to get it into your blog in the size and position that you prefer. So it's really a two step process. I will explain both.
Uploading a picture to the web
Blogger Button
Blogger has an upload button (see below) that actually takes care of both steps. It lets you upload a photo from your computer and place it right into your blog - but I don't like it. It just doesn't give me enough options.

The only picture sizes available using this method are:
small (200 px)

medium (320 px)

or large (400 px)

Picture sizes are limited and you can see how they end up in random places making it hard to allign text with photos.
Picasa Web Albums
I like to have more control so I use a different method. I upload my photos to a Picasa Web Album and paste links from there into my blogs. It's funny because the Blogger button actually puts photos into their own special Picasa web album created just for your blog.
Creating a Picasa Web Album
In order to use create a Picasa Web Album you first need to sign up. Go to the Picasa Web Album website and sign in using your gmail address and password. If you don't have one, shame shame, it is my favorite email service. You can always sign up free for a gmail account.
Once you have signed in, you will be taken to a screen like this:

There are two ways to get photos into your online albums:
The "Launch Picasa" button will take you to the Picasa application on your computer, assuming you have it installed and are using it. It's a great program for organizing photos and you can download it for free. With that program installed, you can upload your photos directly from Picasa on your computer to Picasa Web Albums. I don't use Picasa on my computer so I'm afraid I'm not an expert on this method.
The second option is the "Upload" button. That will take you to a screen like this:

Your window may be empty but, as you can see, I have quite a few albums already created. I like to organize them by month or special collection. You have the option to upload photos to an existing album (click on the album you want to use and then 'select album') or you can create a new album by clicking on that phrase at the top of these screen.
Once your album is selected or created, you will be taken to this screen.

You can upload up to 5 photos at once by clicking on the 'browse' button and navigating to the picture on your computer (nicely organized into folders I hope). When you have selected your photos, click 'start upload' and they will appear in your album.
If you use a mac computer, there is still an easier way to upload photos that I prefer. Download the Picasa Web Album Uploader for Mac. With this application, you can upload many pictures at once by dragging them into the uploader window. It looks like this:

You can select an album or create a new one. You can designate upload size. I use the "Faster upload (1000px) option" because that is plenty big for blogging.
So those are a few options for getting pictures hosted on the web. Next we need to get them into our blogs.
Adding a Picture to Blogger
Open up your Picasa Web Album and you will see all of your photo albums
I guess I have quite a few (131!). Picasa gives you a little over 1 GB of photo storage free. If you limit your uploads to the 1000px version - that ought to last quite a while. Picasa offers an upgrade for a fee that gives 20 GB of storage.
Select the album you want and you will see your photos
Now select the photo you want and you will see this screen
Selecting the code
The important information is off to the right - click on the phrase 'link to this photo' and a few windows will open up just below that say 'link' and 'embed image'.
We are interested in embedding. Right below 'embed image' is the code that you need to paste into your blog. But first we need to make a few selections.
Select size by clicking on the little arrow to the right of the pull down window. You can choose thumbnail (144px), small (288px), medium (400px), or large (800px). You may ask why the jump from 400 to 600? I wonder that too - especially since 600px is the size I prefer to use in blogging! Standard Blogger templates are about 800 pixels wide. I use a 'stretch' template that stretches to the width of the computer window. That's nice for bigger pictures. If you use a standard blogger template, medium (400px) images will be about right. If you use a stretch template 600 px is perfect but you will need to customize the embedded code to get it. I'll show you how to do that later (don't worry - it's not too difficult!). Meanwhile - here is what the four size options look like.
thumbnail (144px)
small (288 px)
medium (400px)
large (800px)
and here's my customized 600 px size - perfect, isn't it?
You also have some choices to make about links. The choices are right below your 'embed image' code. I always click the box 'hide album link'. This just avoids extra text in the blog and makes it easier to customize photo size. The other box 'image only, no links' gives you a choice about what will happen when someone clicks on the picture in your blog. I leave it blank. Here is what my choices look like:
Now that you have everything selected, let's get the code. This is quite easy. Just click anywhere inside the box under 'embed image'. The code will all turn blue meaning it's been selected. If that doesn't work, just drag and highlight all the code. Now copy it - control 'C' or go to 'edit' at the top of the screen and then 'copy'.
The code is now on your 'clipboard' and we are ready to paste it into your blog. I'll show you how to do that step by step in a sample blog post.
Pasting the code
Here's some text

To add a photo, put your cursor where you want it and paste - Control 'V' or 'Edit' 'Paste'. Here's the code.

But wait - that doesn't look like a picture!
That's OK - you just need to toggle back and forth between the two tabs at the top of your blogger window. They say 'Edit Html' or 'Compose'. In Blogger, it doesn't matter which you use to paste the code. But to see the picture you must click on the 'Compose tab' or, if you are already in Compose, click 'Edit Html' and then back to 'Compose'.
And Ta Dah! Your picture appears

Isn't that easy?
Here's what's really nice. If you want to move your picture, you can go into 'Edit Html' mode, copy the code and paste it anywhere in your blogger window.
Customizing picture size
Now - here is the slightly tricky part - customizing the size. I almost always want to use a width of 600px. So here's what I do. I paste in the large size picture (800px) and then modify the code to make it slightly smaller. Make sure you can see the embeded code. You may need to click on the 'Edit Html' tab.
Let's take a closer look at the code

The arrow is pointing to a spot right after .jpg"
That's where you need to do a little editing. Type in width=600 (or whatever size you want) so it looks like this. I like to put a space on either side of my typing just so everything is easy to see.

Now, when you click the 'Compose' tab to see your picture - it will be the perfect size! That's not too difficult, right? I use this all the time. I like 'width=600' for horizontal pictures and 'width=400' for vertical. That keeps things nice and uniform.
That's what I just did for this blog - went into all my code and changed the widths to 600.
I hope this somewhat lengthy blog post helps. If you have questions or suggestions on this topic, please add a comment and I will address them.
Tuesday, May 5, 2009
Backing up photos

I am sitting at my computer trying to back up photos (1999 to 2006) off an old external hard drive.
It is a messy process.
If you want to keep memories alive, it is extremely important to back up photos.
Here is my current system (I wish I had done it all along!)
First - every time you are ready to empty a digital camera card first BURN A COPY OF THE FILES! This is just like those old packets of negatives we (meaning older folks like me who remember negatives) used to keep in drawers. It will give you a pristine copy of each photo file just in case you do something terrible to mess up the copy on your computer. DVDs are not that expensive and this is worth the effort. It is what professional photographers do. My 4 GB card works perfectly since it fits on one DVD. If I have a smaller card, I burn on a CD or stockpile the files in a carefully labeled folder on my computer until there are enough to justify burning on a DVD.
Second - I assume you transfer all of your photos and store them somewhere on your computer for editing and sharing. This can be done in various programs (Picasa, iPhoto, Adobe bridge). Since you have a nice back up copy of every photo burned on DVD, you don't need to keep all 12 shots of grandma body surfing. Just pick the best and delete the rest (remember, you have them safely backed up). This slims down the folders of photos stored on your computer.
Third - Occasionally back up the photo files stored on your computer. Hopefully they will be the best of the best nicely labeled, dated, and organized. You can burn them unto a DVD or copy to an external hard drive. Yes I know - you already burned the photos right off the memory card. But the ones on your computer are organized and edited. It is worth making this second copy. There are huge capacity affordable USB hard drives available now that are tiny and portable. I actually do both - burn to DVD and transfer to an external hard drive (I love my photos so much). After this is done, you can delete the files off your computer when it fills up.
Of course, you need to carefully label and safely store those DVDs so you can access them when needed.
Sunday, April 19, 2009
Gmail is getting full - what to do?
I just filled up my 3rd (that's right 3rd!) Gmail account.
Gmail has plenty of storage - for most people. And they keep adding it every day. As of April 19, 2009 they offer 7.86 GB of storage. Picasa (which I have almost filled up as well) has 1 GB.
I don't know why, but that is not enough Gmail storage for me. I send and receive loads of photos and pdf files so maybe that is why I tend to fill up accounts.
One solution is to pay for more storage. Check here for more information.
If you don't want to do that, here are a couple of free solutions:
In the past I have just created a new Gmail account and had mail forwarded. But that option had some challenges - the biggest being exporting my contact list. I can get all the addresses in the new account, but so far (as of April 19,2009) Gmail doesn't have a way to export contact groups. I use groups all the time and it is a royal hassle to recreate them.
Or - you can clean up your current account
So today I decided to do some Gmail 'spring cleaning' by getting rid of some messages. Since I have over 7,ooo inbox messages and who knows how many sent messages, I wasn't about to go through them one by one. What I really wanted was to delete messages with large attachments. I didn't want to do that for messages sent to me, because there are some precious photos in that group that are wonderfully searchable and difficult to recreat if lost. Keeping them in gmail is a great way to have a backup. But the messages I sent to others are not as important to save since I have them (somewhere) on my hard drive or in back ups.
Here is what to do to just find sent messages with attachments:
type this into the 'search mail' window at the top of your gmail screen:
has:attachment from:me label:sent
if you want to find all messages (sent and received) with attachments type:
has:attachment
Scan through these messages (if you want) to make sure you don't mind deleting them.
Just above your list of emails there is an option to 'select' 'all'.
Do that
Now a little message will appear that asks if you want to select all messages from that search. Click that and now everything is selected.
Now, get brave, and click 'delete'. You will get a chance to change your mind when Gmail asks if you are sure.
When I did that, my account went from 94% full to 61% full!
Gmail has plenty of storage - for most people. And they keep adding it every day. As of April 19, 2009 they offer 7.86 GB of storage. Picasa (which I have almost filled up as well) has 1 GB.
I don't know why, but that is not enough Gmail storage for me. I send and receive loads of photos and pdf files so maybe that is why I tend to fill up accounts.
One solution is to pay for more storage. Check here for more information.
If you don't want to do that, here are a couple of free solutions:
In the past I have just created a new Gmail account and had mail forwarded. But that option had some challenges - the biggest being exporting my contact list. I can get all the addresses in the new account, but so far (as of April 19,2009) Gmail doesn't have a way to export contact groups. I use groups all the time and it is a royal hassle to recreate them.
Or - you can clean up your current account
So today I decided to do some Gmail 'spring cleaning' by getting rid of some messages. Since I have over 7,ooo inbox messages and who knows how many sent messages, I wasn't about to go through them one by one. What I really wanted was to delete messages with large attachments. I didn't want to do that for messages sent to me, because there are some precious photos in that group that are wonderfully searchable and difficult to recreat if lost. Keeping them in gmail is a great way to have a backup. But the messages I sent to others are not as important to save since I have them (somewhere) on my hard drive or in back ups.
Here is what to do to just find sent messages with attachments:
type this into the 'search mail' window at the top of your gmail screen:
has:attachment from:me label:sent
if you want to find all messages (sent and received) with attachments type:
has:attachment
Scan through these messages (if you want) to make sure you don't mind deleting them.
Just above your list of emails there is an option to 'select' 'all'.
Do that
Now a little message will appear that asks if you want to select all messages from that search. Click that and now everything is selected.
Now, get brave, and click 'delete'. You will get a chance to change your mind when Gmail asks if you are sure.
When I did that, my account went from 94% full to 61% full!
Emailing higher resolution pictures in Picasa

Don't you wish you could see the faces of these darling children from Guyana?
Do you want to avoid emailing photos that turn out like this?
I know - I exaggerated the problem by making this photo very very low resolution - but you can limit the impact and usability of photos by sending them in small sizes.
Photo size is most often measured by pixels - that is dots per inch. This is also known as resolution. Optimal resolution depends on the end use of the photo. Here is what I like:
For presentations, I like the largest dimension to be at least 1000 pixels.
For printing, full resolution is best.
If you are using Picasa to host and email your photos, here is how to adjust resolution (from the Picasa help website):
Sending multiple photos at once:
1. In Picasa, click Tools > Options (Windows) or Picasa > Preferences (Mac).
2. Select the Email tab.
3. Use the slider to set your desired pixel size when emailing multiple photos. Use the radio buttons to set the desired pixel size for emailing single photos.
4. Click OK.
Sending one photo at a time - the only way to get full resolution:
You can email a photo in its full resolution using Picasa, however you can only send one full resolution photo at a time. Please follow these steps to set your email options to send photos in their original size:
1. Click Tools > Options (Windows) or Picasa > Preferences (Mac).
2. Select the Email tab.
3. Under 'When sending single pictures, resize to:' (Windows) or 'Size for single pictures' (Mac), select the 'Original Size' option.
4. Click OK.
Once this option is selected, any single photo you send using Picasa will be in full resolution. It's not possible to send multiple photos at once in their original sizes.
Saturday, March 21, 2009
Blogging - custom sized pictures
This is for Sister Bullock who writes a wonderful blog
I am going to assume you already know how to embed an image from Picasa
OK - just in case you don't know that - here is a quick 'how to' lesson
Image Sizes
When you embed an image from picasa you have a choice of sizes and whether or not to include the album link (I never do). Unfortunately, the only sizes they allow are thumbnail (144 px), small (288 px) medium (400 px), and large (800 px).
Why the jump from 400 to 800???
I have no idea
Medium 400 px is fine for a normal blog layout. But if you want to emphasize photos rather the text, it's nice to use a stretched layout in Blogger so that nice big photos can be displayed. However, the large photos are just a bit too big at 800 px. The perfect size would be 600 px - but how do we get that?
It's not too difficult
All you have to do is type this:
width=600
and make sure it is in the correct place
When you past the HTML code into your blog from Picasa it looks something like this.

Look carefully and you will see a section in quotes - that is the address of the image. It finishes here with _MG_2235.jpg"
After the ending of the final quote, you can add extra information about image size
That is where you type those magic letters - width=600 - so your code will now look like this:

Be sure to type it with no spaces - after the final quote and before the forward slash. I always keep a space on either side of the text but I'm not sure that is necessary.
That's all!
When you publish the blog or click back and forth between 'Edit Html' and 'Compose' you will see your perfectly sized image in place of the code.
If you want to move the image, just cut and paste the code.
I am going to assume you already know how to embed an image from Picasa
OK - just in case you don't know that - here is a quick 'how to' lesson
- Upload your images to picasa (if you don't know about picasa, let me know and I'll add more information)
- Click on the image you want (it will fill most of the screen)
- Look for the words "link to this photo" at the right and click on them
- This will open a menu of options - you want to copy the information (HTML code) below the words "embed image" (control 'C')
- Paste that code into your blog as you are creating it. It will look like nonsense but when you publish, it will turn into your Picasa image.
Image Sizes
When you embed an image from picasa you have a choice of sizes and whether or not to include the album link (I never do). Unfortunately, the only sizes they allow are thumbnail (144 px), small (288 px) medium (400 px), and large (800 px).
Why the jump from 400 to 800???
I have no idea
Medium 400 px is fine for a normal blog layout. But if you want to emphasize photos rather the text, it's nice to use a stretched layout in Blogger so that nice big photos can be displayed. However, the large photos are just a bit too big at 800 px. The perfect size would be 600 px - but how do we get that?
It's not too difficult
All you have to do is type this:
width=600
and make sure it is in the correct place
When you past the HTML code into your blog from Picasa it looks something like this.
Look carefully and you will see a section in quotes - that is the address of the image. It finishes here with _MG_2235.jpg"
After the ending of the final quote, you can add extra information about image size
That is where you type those magic letters - width=600 - so your code will now look like this:
Be sure to type it with no spaces - after the final quote and before the forward slash. I always keep a space on either side of the text but I'm not sure that is necessary.
That's all!
When you publish the blog or click back and forth between 'Edit Html' and 'Compose' you will see your perfectly sized image in place of the code.
If you want to move the image, just cut and paste the code.
Friday, February 13, 2009
Sharing PowerPoint presentations online
I was asked recently how to share put a PowerPoint presentation on the web.
I have not been terribly successful doing that, so I will explore a few ways and post about them here, with more information coming in the future.
First and easiest, in my opinion, is to save the presentation as a movie ('file', 'save as movie'). I need to learn more about how to tweak the timing and other settings. There is an option to include music (go to 'movie options' in the 'save as movie menu). Then the powerpoint movie can be uploaded to google video or direct to blogger. This creates a self playing slideshow out of the slides.
Another option is Google docs. That fine service now supports PowerPoint files - but only in the .ppt format, not the new .pptx. So the files need to be saved as .ppt.
I don't yet know about all the options. The one I tested is manually advanced slide by slide.
Here is an embeddeded test slideshow I just uploaded through google docs.
Google Docs is a great service for hosting and sharing text, spreadsheet, and presentation documents.
I have not been terribly successful doing that, so I will explore a few ways and post about them here, with more information coming in the future.
First and easiest, in my opinion, is to save the presentation as a movie ('file', 'save as movie'). I need to learn more about how to tweak the timing and other settings. There is an option to include music (go to 'movie options' in the 'save as movie menu). Then the powerpoint movie can be uploaded to google video or direct to blogger. This creates a self playing slideshow out of the slides.
Another option is Google docs. That fine service now supports PowerPoint files - but only in the .ppt format, not the new .pptx. So the files need to be saved as .ppt.
I don't yet know about all the options. The one I tested is manually advanced slide by slide.
Here is an embeddeded test slideshow I just uploaded through google docs.
Google Docs is a great service for hosting and sharing text, spreadsheet, and presentation documents.
Tuesday, November 11, 2008
Comparing slideshow hosting
I have used four services to host slideshows and thought I would do a comparison here between Picasa, Flickr, Smugmug, and Smilebox
Picasa
Pros
Cons
Flickr
Pros:
Cons:
Smugmug
Click here to link to full screen version
Pros:
Cons:
Smilebox
Pros:
Cons
Bottom line
My favorite - Flickr, but I need to pay for a pro account.
Picasa
Pros
- easy to use
- lots of free storage
Cons
- can't view full screen - clicking on the slideshow leads to the picasa site
- even in picasa, images are smallish
Flickr
Pros:
- easy to upload
- easy to organize photos within the site
- nice full screen option
Cons:
- free version didn't allow me to upload all my photos
- I couldn't figure out how to upload lower res (but it might be available)
Smugmug
Click here to link to full screen version
Pros:
- nice filmstrip interface
Cons:
- extremely hard to figure out how to embed slideshow
- couldn't figure out how to allow full screen version
- odd blank space in blog post
- clicking on photo takes you to smugmug opening screen - very strange
Smilebox
 |
 |
| Make a Smilebox slideshow |
Pros:
- music
- full screen option
- lots of style options (most of them are irritating)
Cons
- Hate it!!! - they constantly ask for pro sign up (=spend money) and the program hijacked my computer and added all kinds of stuff and I'm still not sure I got rid of it.
- huge con - no way to show all of photos with vertical orientation
- very difficult to work within their programs
- irritating constant asking to buy pro version
- ads in free version
- full screen takes you to new website
Bottom line
My favorite - Flickr, but I need to pay for a pro account.
Comparing photo hosting services
I have been playing around with picasa, flickr, and smugmug trying to decide which is best. Last time I looked it seemed like flickr photos were duller in color so I thought I would do a test here. I will embed the same photo from each service so we can compare.
Picasa

Flickr

Smugmug

Interesting - picasa photos have more color intensity, don't you think? Flickr and Smugmug seem about the same.
Picasa
Flickr
Smugmug
Interesting - picasa photos have more color intensity, don't you think? Flickr and Smugmug seem about the same.
Friday, April 18, 2008
Working with photos in Word - easyish

It ought to be very simple to drop a photo in a Word document and move it around wherever you want. Right? But it is not. In fact it can be a terribly frustrating task. Here is one little trick that makes the process somewhat simpler.
Insert
When you add a photo to Word through the 'insert' menu or by dragging and dropping, it defaults to an 'inline layout'. That means that the picture is stuck in place on the document just like the text you type. It moves as you press return and/or type text above it but you can't drag it around on the page. You can resize it (remember to only use the corners or hold down 'shift' so you won't change the proportions).
Unstick
Here is what you do to fix the 'stuck photo' problem. You need to open up the 'format pictures' menu. You can do this either by double clicking on the picture or highlighting the picture and going to the 'format' (top of the screen) and 'picture' commands. That opens up a menu that varies according to the version of Word you are using. You need to find the 'layout' window (the little blue doggie) and then select 'tight'. This command magically frees up your photo and allows you to drag it all around.
Watch out!
However, Word still has its quirks and sometimes you think you have everything set and then pictures start sliding around all by themselves. I don't know how to deal with this and that is why I use a Mac!
Get a Mac
Here is the best suggestion I can give - buy a Mac, install iWork, and use Pages. It is a FABULOUS program for page layout. I love its simplicity and style. It is almost worth buying a Mac just to use Pages if you want to work with text and photos and don't want the expense or steep learning curve of Photoshop and InDesign.
If you are using a mac and want some help, I have started a new blog with a mac friend called Granny Macs. It is in process but will be fun as we add more. Take a look!
Thursday, March 27, 2008
iMovie video clip sound problem - techie
I have had to deal with this problem twice now. The first time, a year or so ago, I figured out how to solve it and then I promptly forgot. The same problem just came up again last night and this time I am going to record the (newer and better) solution.
Problem:
Some cameras (in my case a sony digital still camera) record video in a format that is incompatible with iMovie. The clip imports into iMovie just fine, but there is no audio. I did some internet surfing and found this is because the file is muxed which means the audio and video are intermixed and for some reason, iMovie does not like this. The solution is convert the file to a different format. The best program I found is MPEG Streamclip. It is a free download and is easy and efficient to use. Here is what to do to fix the no audio problem:
Now you can import and edit the new Quicktime file.
Problem:
Some cameras (in my case a sony digital still camera) record video in a format that is incompatible with iMovie. The clip imports into iMovie just fine, but there is no audio. I did some internet surfing and found this is because the file is muxed which means the audio and video are intermixed and for some reason, iMovie does not like this. The solution is convert the file to a different format. The best program I found is MPEG Streamclip. It is a free download and is easy and efficient to use. Here is what to do to fix the no audio problem:
- Download and install MPEG Streamclip
- Open Streamclip
- Import your video file by using 'file' - 'import' or drag the file from your finder to the Streamclip window.
- Select 'file - 'import to Quicktime' - you will be given a chance to name the file and select a destination.
- That's all - you're done!
Now you can import and edit the new Quicktime file.
Wednesday, March 26, 2008
Unlocking files - Macs only - easy
Sometimes people give me photos that are locked. I suppose they were locked while in their camera in order to protect them. But that means, I can't change or delete the files. It is quite simple to unlock a mac file. Just locate the file in the finder, highlight but don't open, and then press the command+I (for info) keys. This brings up an information window. About halfway down the window you will see the word 'locked'. Click on checked box and it will uncheck and unlock.
Sometimes I end up with locked files in the trash and it won't empty completely. Just double click the Trash, select the files and follow the steps above to unlock.
Sometimes I end up with locked files in the trash and it won't empty completely. Just double click the Trash, select the files and follow the steps above to unlock.
Subscribe to:
Posts (Atom)