Tuesday, November 11, 2008

Comparing slideshow hosting

I have used four services to host slideshows and thought I would do a comparison here between Picasa, Flickr, Smugmug, and Smilebox

Picasa


Pros
  • easy to use
  • lots of free storage

Cons
  • can't view full screen - clicking on the slideshow leads to the picasa site
  • even in picasa, images are smallish

Flickr


Pros:
  • easy to upload
  • easy to organize photos within the site
  • nice full screen option

Cons:
  • free version didn't allow me to upload all my photos
  • I couldn't figure out how to upload lower res (but it might be available)

Smugmug

Click here to link to full screen version


Pros:
  • nice filmstrip interface

Cons:
  • extremely hard to figure out how to embed slideshow
  • couldn't figure out how to allow full screen version
  • odd blank space in blog post
  • clicking on photo takes you to smugmug opening screen - very strange


Smilebox


Click to play Maracas Waterfall
Create your own slideshow - Powered by Smilebox
Make a Smilebox slideshow


Pros:
  • music
  • full screen option
  • lots of style options (most of them are irritating)

Cons
  • Hate it!!! - they constantly ask for pro sign up (=spend money) and the program hijacked my computer and added all kinds of stuff and I'm still not sure I got rid of it.
  • huge con - no way to show all of photos with vertical orientation
  • very difficult to work within their programs
  • irritating constant asking to buy pro version
  • ads in free version
  • full screen takes you to new website

Bottom line
My favorite - Flickr, but I need to pay for a pro account.

Comparing photo hosting services

I have been playing around with picasa, flickr, and smugmug trying to decide which is best. Last time I looked it seemed like flickr photos were duller in color so I thought I would do a test here. I will embed the same photo from each service so we can compare.

Picasa


Flickr
pink

Smugmug


Interesting - picasa photos have more color intensity, don't you think? Flickr and Smugmug seem about the same.

Friday, April 18, 2008

Working with photos in Word - easyish


It ought to be very simple to drop a photo in a Word document and move it around wherever you want. Right? But it is not. In fact it can be a terribly frustrating task. Here is one little trick that makes the process somewhat simpler.

Insert
When you add a photo to Word through the 'insert' menu or by dragging and dropping, it defaults to an 'inline layout'. That means that the picture is stuck in place on the document just like the text you type. It moves as you press return and/or type text above it but you can't drag it around on the page. You can resize it (remember to only use the corners or hold down 'shift' so you won't change the proportions).

Unstick
Here is what you do to fix the 'stuck photo' problem. You need to open up the 'format pictures' menu. You can do this either by double clicking on the picture or highlighting the picture and going to the 'format' (top of the screen) and 'picture' commands. That opens up a menu that varies according to the version of Word you are using. You need to find the 'layout' window (the little blue doggie) and then select 'tight'. This command magically frees up your photo and allows you to drag it all around.

Watch out!
However, Word still has its quirks and sometimes you think you have everything set and then pictures start sliding around all by themselves. I don't know how to deal with this and that is why I use a Mac!

Get a Mac

Here is the best suggestion I can give - buy a Mac, install iWork, and use Pages. It is a FABULOUS program for page layout. I love its simplicity and style. It is almost worth buying a Mac just to use Pages if you want to work with text and photos and don't want the expense or steep learning curve of Photoshop and InDesign.

If you are using a mac and want some help, I have started a new blog with a mac friend called Granny Macs. It is in process but will be fun as we add more. Take a look!

Thursday, March 27, 2008

iMovie video clip sound problem - techie

I have had to deal with this problem twice now. The first time, a year or so ago, I figured out how to solve it and then I promptly forgot. The same problem just came up again last night and this time I am going to record the (newer and better) solution.

Problem:
Some cameras (in my case a sony digital still camera) record video in a format that is incompatible with iMovie. The clip imports into iMovie just fine, but there is no audio. I did some internet surfing and found this is because the file is muxed which means the audio and video are intermixed and for some reason, iMovie does not like this. The solution is convert the file to a different format. The best program I found is MPEG Streamclip. It is a free download and is easy and efficient to use. Here is what to do to fix the no audio problem:

  1. Download and install MPEG Streamclip
  2. Open Streamclip
  3. Import your video file by using 'file' - 'import' or drag the file from your finder to the Streamclip window.
  4. Select 'file - 'import to Quicktime' - you will be given a chance to name the file and select a destination.
  5. That's all - you're done!

Now you can import and edit the new Quicktime file.

Wednesday, March 26, 2008

Unlocking files - Macs only - easy

Sometimes people give me photos that are locked. I suppose they were locked while in their camera in order to protect them. But that means, I can't change or delete the files. It is quite simple to unlock a mac file. Just locate the file in the finder, highlight but don't open, and then press the command+I (for info) keys. This brings up an information window. About halfway down the window you will see the word 'locked'. Click on checked box and it will uncheck and unlock.

Sometimes I end up with locked files in the trash and it won't empty completely. Just double click the Trash, select the files and follow the steps above to unlock.

Rotating text in Word - fiddly

Today someone asked me how to rotate text in Word. Surprisingly, there isn't an easy way. Here is what I came up with using Microsoft Office 2004 (version 11.3.5) on my mac:
  1. create a text box
  2. type the text into the box and format (I centered it)
  3. remove any text box formatting you don't want such as a line (default in my program) - you do this by clicking format (pull down menu at top of screen) - colors and lines - line - no line
  4. Select the text box so that it can be copied (sometimes this takes two clicks)
  5. Cut the text box by using control X or edit cut, the text box will disappear and be placed on the clipboard
  6. click on Edit (putt down menu at top) - paste special - paste as picture - now it is an object that can be rotated
  7. make sure the 'drawing' toolbar is showing - if not go to View - Toolbars - Drawing
  8. select the text box, click on the rotate tool in the tool bar, mouse over a corner of the box, and rotate.

If you have WordArt installed you could try playing with that.

Good luck!

Important new direction

I haven't been posting to Granny Tech very often because of time demands on my mission. However, I still get lots of 'how to' computer requests. When I go to the trouble of responding to computer questions it makes sense to share the information here. For now, the post topics won't be terribly organized but I will label them so they are usable. I will also add a difficulty level to the titles so it is easy to get appropriate help.

I have a new site called Granny Macs that I am doing with a friend. We plan to blog step by step instructions on how to get started using a mac. Take a look if you are interested!

Saturday, February 2, 2008

Geeky ladies - iphoto plus gmail (macs only) - fiddly


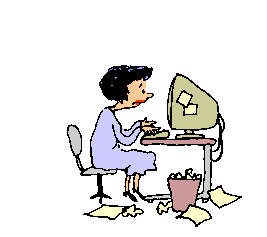
My friend Ruth and her husband David have a snazzy new macbook computer. They just came to visit my husband and I here in Trinidad and we had some fun computer chats. Now that Ruth is home I see her online all the time (gmail chat) so I told her she is turning into a computer geek. Today she was trying to figure out how to send an iphoto picture via gmail. This is not a simple task so we had quite a (gmail chat) conversation. Because others may be having the same challenge, I thought I would paste our conversation here:

ME: click to open the smiley blue square at the left side of your dock (bottom of the screen)
it is called the finder
smiley is the man!
he knows where everything is in your computer

Ruth: got it

ME: do you see pictures folder?

Ruth: yes

ME: click on it

Ruth: got it

ME: you should see a list of your pictures folders
are there some in there?

Ruth: there is photo library and photo booth

ME: ok
let's add a new one
click on 'pictures' so it is highlighted
now look at the daisy looking thing at the top of the screen
click on the little downwards pointing triangle
it will drop down a menu
click on 'new folder'

Ruth: got it

ME: and name it
mine is named *for email
I put the asterisk so the folder will be at the top of the list

Ruth: did it

ME: so - you now have a folder created to hold your emailable pictures
now open iphoto
this may seem like lots of steps but it is really quite easy once it is set up

Ruth: okay

ME: are you in iphoto?

Ruth: yes

ME: highlight the picture or pictures you want to email
click on 'file'
then 'export
a menu pops up
there are 4 choices at the top of the menu
you want 'file export'
then you can pick the size of the images

Ruth: hang on I made one of the pics completely disappear!

ME: push command Z
to undo stuff
or edit undo

Ruth: okay I got the pic back
I am at the export stage
what's next Dr imac?

ME: you need to tell it what size picture
size will vary depending on what your purpose
if you are sending a pic for someone to print
you want a larger file
if they will just look at it on the computer, you want smaller

Ruth: how do I make it smaller?

ME: for smaller type 700 or 800 into the box with the largest number
first click on 'scale images no larger than:
then you can type
that will make a smaller pic
then click on export
you can give the pic a title
and tell where to put it
you want to put it in your new handy dandy *for email folder

Ruth: there's nothing that says scale images, just small med large

ME: really?
yours is different than mine
ok - just click the size you want
I like medium
does it give you a choice where to put it?

Ruth: ummmmm
can't see that
hey I think I did it!
now what did I do?

ME: you have nice little photos waiting for you to email

Ruth: I clicked on export and it said where?

ME: now open gmail
as I explain this it sounds so incredibly complicated
but it isn't that bad

Ruth: k

ME: so compose your message
you can test one to me
one thing - most of the settings you are making this run through will open as defaults next time you do this - so that is a bit easier

Ruth: OK

ME: now click on 'attach a file'
then browse
should open up your happy face finder

Ruth: how do I browse?

ME: click the word browse

Ruth: desktop comes up in box

ME: good
look for the pictures folder

Ruth: got it and got both pix chosen and attached
shall I send them?

ME: yes!

Ruth: it worked Di
you are a genius

ME: now do it 10 times so you don’t forget
you have learned some things that will help you with other tasks too
how to navigate the computer
make folders

Monday, January 28, 2008

Shortcut Keys


I have a goal to learn a shortcut key combination every week or so for the next little while. Shortcut keys are keystroke combinations that perform functions that normally take a number of mouse clicks. They are efficient because you don't need to take your hands off the keyboard to perform common actions. Here is a list of the ones I find most useful (mac keystrokes in parentheses):

Copy - control (apple command) C
Paste - control (apple command) V
Cut (copies and removes the selected item) - control (apple command) X
Undo (I use this ALL the time) - control (apple command) Z
Quit a program - control (apple command) Q
Save (do this often to protect your work)- control (apple command) S

You can find many more by searching 'shortcut' in the help menus for various programs. Why don't you make a useful habit by trying one of these shortcuts for the next few days?

Monday, January 21, 2008

Keeping up with all those blogs using RSS feeds


RSS feed - why would I want that?


We have talked about blogging for quite a while. Now - how are you going to keep up with all of the exiting new blogs you and your friends are creating?

Here's what I do:
Many blogs and websites have an option that allows you to be notified when new content is added. Blogger has a nice built in feature labeled "Subscribe to: Posts (Atom)". Scroll to the bottom of this page and you will see it. This is an RSS feed - which means... "Really Simple Syndication" which means..."Web feed formats used to publish frequently updated content such as blog entries, news headlines or podcasts" (quoted from Wikipedia) which means (in simple terms)... you can be notified when something is added to your favorite blogs such as a brand new Granny Tech lesson!

The easiest way to keep up with your blogs:

Have 'feeds' sent to your iGoogle homepage (see my earlier post on setting up iGoogle). You can set up a new dedicated iGoogle page labeled 'blogs', or add the feeds to your main page.
  1. Start out by opening up the page you want to use in iGoogle.
  2. Next, open the blog you want to track in a different tab or window. If it is a 'Blogger' blog you can click on "Subscribe to: Posts (Atom)" at the bottom of the page. You will be given a choice: 'add to Google homepage' or 'add to Google reader'.
  3. Choose the homepage option. A new gadget listing the latest blog posts will appear.
  4. Other types of blogs or websites often have RSS feed options at the bottom of the page that can be added in a similar manner.
An example:
I really like Time magazine. I used to read it cover to cover every week before moving to Trinidad. Now I subscribe to the RSS feed instead. Here is how to do that:
  • Open up the Time website
  • Scroll to the bottom of the page
  • You will see this:


(click on image to enlarge)


  • Just click on either of the RSS link options: 'get Time RSS feeds' or 'RSS feeds (at the very bottom).
  • You will be given a number of topic options. Select and click on the one you want (I like 'Top Stories') and then click 'add to Google'.

Voila - you are up to date with the latest news!

iGoogle


Google has so many fun toys!


My latest favorite is iGoogle. It allows you to set up a personalized homepage that will open each time you connect to the internet. You can put all kinds of fun (important, amazing, essential) things on your page. In fact, if there are many many fun (important, amazing, essential) things you must see every day - you can set up multiple pages using tabs. I have expanded from one to eight pages in the past few months.

Setting up iGoogle is very easy to do - all you need is a Gmail account. If you don't have one yet, look at my earlier post on using Gmail.

Here is how to get started:

  • Go to the iGoogle website and sign in using your Gmail account info.
  • Your new homepage will appear but it's not personalized yet. Google will suggest items for your page consisting of little windows of internet content Google calls 'Gadgets'. You can go with the default suggestions or add popular gadgets by clicking boxes at the top of the page.
  • When you have a few basics in place, click "Save" in the upper left.
  • Now the creativity begins: Click on the "Add stuff" button at the top right. All kinds of gadgets appear. You can browse through groups of gadgets by clicking on categories at the left or you can search for specific content by using the search window. Just for fun I put in the words 'eye strain' (I have been working on this blog for a while) and an eye tester game appeared as well as 'famous optical illusions'. Cool, eh?
  • When you find something you like just click 'add it now'. Keep adding until you are absolutely happy. Then click 'back to the iGoogle homepage' at the upper left.
  • Now you see your new, personalized, iGoogle page. But - you are not done yet. You can rearrange your new found gadgets by dragging them around the page. Just grab the colored bar at the top of the gadget, drag and drop.
  • If your page is too full (you probably won't want to scroll way down to see everything) just create a new page by clicking on 'add a tab' just below the big search window. You will be prompted to give the tab a name and then a new page will appear asking if you want to accept some iGoogle content or, if not, a blank page will appear all ready to 'add stuff'.
  • But wait a minute. We don't want to add stuff - we already had too much stuff! Here is what you do - click on your first (too full) page's tab and just drag and drop the gadgets you want to move right on to the new tab. The gadgets will magically migrate to the new page living you two marvelous, minimalist, perfectly organized iGoogle pages.
Here are the names of my eight tabs - just to give you a few ideas:
  1. Home
  2. News
  3. Blogs
  4. Productivity
  5. Health
  6. Fun
  7. LDS
  8. Mac
Here are some of my favorite gadgets:
  • Gmail inbox
  • Weather (at my home and my kids')
  • News feeds
  • Stock Market
  • Quotes of the day
  • National Hurricane Center (I live in the Caribbean)
  • Feeds from favorite blogs (if you don't know how to get feeds - that will be the topic of my next post)
  • Customized Google News - this allows you to receive news feeds on search terms you supply. To get it try clicking here or search 'customized google news' in the gadget search window.
You are not quite done yet:

If you want to add a personal touch, you can click on 'select theme' (right next to 'add stuff') and play around with the look of your page.

One last very important thing to do!

If you want your iGoogle page to come up every time you connect to the internet, you must tell that to your browser. I use Firefox and Safari. I'm afraid I don't know much about Explorer. Here is what I do:

Open your iGoogle homepage. Now you will set your opening page preference in your browser. Click the 'preferences' link that drops down when you click on the browser name at the far upper left ('Firefox' or 'Safari'). Go to 'main' (Safari) or 'general' (Firefox), Then 'set to (or use) current page'. This will make the page that is currently open your future opening page.

Let me know how it all works out!