Showing posts with label Blogging. Show all posts

Tuesday, August 25, 2009

Blogger pictures - my way

I've had a number of people ask me how I get nice big pictures like these in my blogs.

I will show you.

In order for a picture to show up on your blog it must be hosted somewhere on the web. So that's the first step. Once it's on the web, you need to get it into your blog in the size and position that you prefer. So it's really a two step process. I will explain both.

Uploading a picture to the web

Blogger Button

Blogger has an upload button (see below) that actually takes care of both steps. It lets you upload a photo from your computer and place it right into your blog - but I don't like it. It just doesn't give me enough options.


The only picture sizes available using this method are:

small (200 px)


medium (320 px)


or large (400 px)


Picture sizes are limited and you can see how they end up in random places making it hard to allign text with photos.

Picasa Web Albums

I like to have more control so I use a different method. I upload my photos to a Picasa Web Album and paste links from there into my blogs. It's funny because the Blogger button actually puts photos into their own special Picasa web album created just for your blog.

Creating a Picasa Web Album

In order to use create a Picasa Web Album you first need to sign up. Go to the Picasa Web Album website and sign in using your gmail address and password. If you don't have one, shame shame, it is my favorite email service. You can always sign up free for a gmail account.

Once you have signed in, you will be taken to a screen like this:


There are two ways to get photos into your online albums:

The "Launch Picasa" button will take you to the Picasa application on your computer, assuming you have it installed and are using it. It's a great program for organizing photos and you can download it for free. With that program installed, you can upload your photos directly from Picasa on your computer to Picasa Web Albums. I don't use Picasa on my computer so I'm afraid I'm not an expert on this method.

The second option is the "Upload" button. That will take you to a screen like this:


Your window may be empty but, as you can see, I have quite a few albums already created. I like to organize them by month or special collection. You have the option to upload photos to an existing album (click on the album you want to use and then 'select album') or you can create a new album by clicking on that phrase at the top of these screen.

Once your album is selected or created, you will be taken to this screen.


You can upload up to 5 photos at once by clicking on the 'browse' button and navigating to the picture on your computer (nicely organized into folders I hope). When you have selected your photos, click 'start upload' and they will appear in your album.

If you use a mac computer, there is still an easier way to upload photos that I prefer. Download the Picasa Web Album Uploader for Mac. With this application, you can upload many pictures at once by dragging them into the uploader window. It looks like this:


You can select an album or create a new one. You can designate upload size. I use the "Faster upload (1000px) option" because that is plenty big for blogging.

So those are a few options for getting pictures hosted on the web. Next we need to get them into our blogs.

Adding a Picture to Blogger

Open up your Picasa Web Album and you will see all of your photo albums


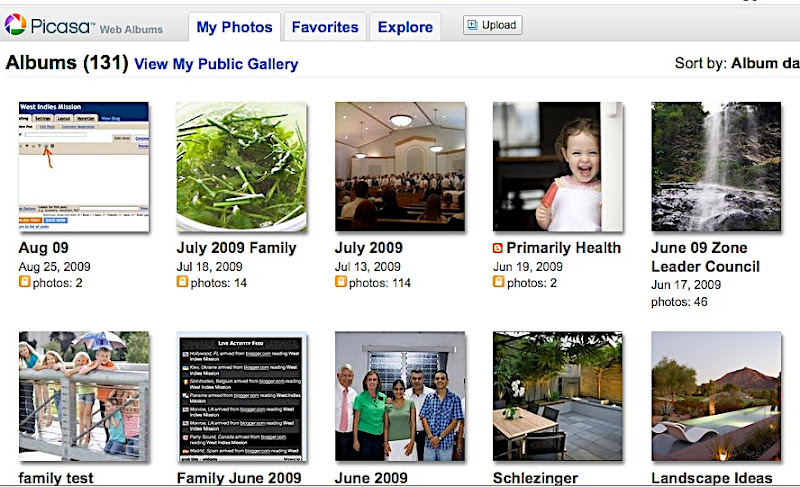
I guess I have quite a few (131!). Picasa gives you a little over 1 GB of photo storage free. If you limit your uploads to the 1000px version - that ought to last quite a while. Picasa offers an upgrade for a fee that gives 20 GB of storage.

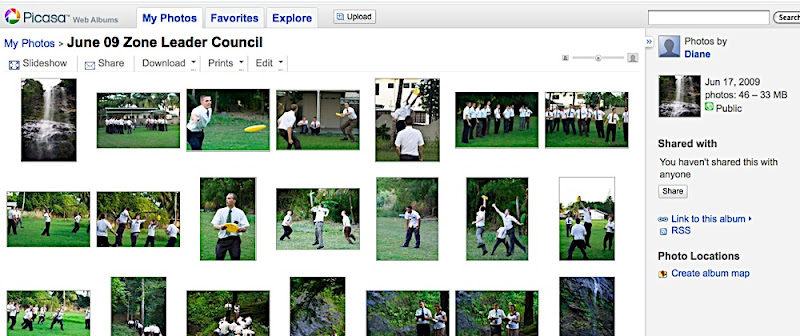
Select the album you want and you will see your photos


Now select the photo you want and you will see this screen


Selecting the code

The important information is off to the right - click on the phrase 'link to this photo' and a few windows will open up just below that say 'link' and 'embed image'.


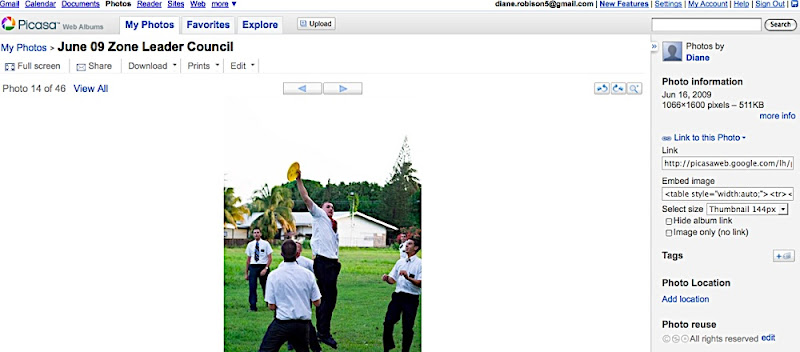
We are interested in embedding. Right below 'embed image' is the code that you need to paste into your blog. But first we need to make a few selections.

Select size by clicking on the little arrow to the right of the pull down window. You can choose thumbnail (144px), small (288px), medium (400px), or large (800px). You may ask why the jump from 400 to 600? I wonder that too - especially since 600px is the size I prefer to use in blogging! Standard Blogger templates are about 800 pixels wide. I use a 'stretch' template that stretches to the width of the computer window. That's nice for bigger pictures. If you use a standard blogger template, medium (400px) images will be about right. If you use a stretch template 600 px is perfect but you will need to customize the embedded code to get it. I'll show you how to do that later (don't worry - it's not too difficult!). Meanwhile - here is what the four size options look like.

thumbnail (144px)


small (288 px)


medium (400px)


large (800px)


and here's my customized 600 px size - perfect, isn't it?


You also have some choices to make about links. The choices are right below your 'embed image' code. I always click the box 'hide album link'. This just avoids extra text in the blog and makes it easier to customize photo size. The other box 'image only, no links' gives you a choice about what will happen when someone clicks on the picture in your blog. I leave it blank. Here is what my choices look like:


Now that you have everything selected, let's get the code. This is quite easy. Just click anywhere inside the box under 'embed image'. The code will all turn blue meaning it's been selected. If that doesn't work, just drag and highlight all the code. Now copy it - control 'C' or go to 'edit' at the top of the screen and then 'copy'.

The code is now on your 'clipboard' and we are ready to paste it into your blog. I'll show you how to do that step by step in a sample blog post.

Pasting the code

Here's some text


To add a photo, put your cursor where you want it and paste - Control 'V' or 'Edit' 'Paste'. Here's the code.


But wait - that doesn't look like a picture!

That's OK - you just need to toggle back and forth between the two tabs at the top of your blogger window. They say 'Edit Html' or 'Compose'. In Blogger, it doesn't matter which you use to paste the code. But to see the picture you must click on the 'Compose tab' or, if you are already in Compose, click 'Edit Html' and then back to 'Compose'.

And Ta Dah! Your picture appears


Isn't that easy?

Here's what's really nice. If you want to move your picture, you can go into 'Edit Html' mode, copy the code and paste it anywhere in your blogger window.

Customizing picture size

Now - here is the slightly tricky part - customizing the size. I almost always want to use a width of 600px. So here's what I do. I paste in the large size picture (800px) and then modify the code to make it slightly smaller. Make sure you can see the embeded code. You may need to click on the 'Edit Html' tab.

Let's take a closer look at the code


The arrow is pointing to a spot right after .jpg"

That's where you need to do a little editing. Type in width=600 (or whatever size you want) so it looks like this. I like to put a space on either side of my typing just so everything is easy to see.


Now, when you click the 'Compose' tab to see your picture - it will be the perfect size! That's not too difficult, right? I use this all the time. I like 'width=600' for horizontal pictures and 'width=400' for vertical. That keeps things nice and uniform.

That's what I just did for this blog - went into all my code and changed the widths to 600.

I hope this somewhat lengthy blog post helps. If you have questions or suggestions on this topic, please add a comment and I will address them.

Saturday, March 21, 2009

Blogging - custom sized pictures

This is for Sister Bullock who writes a wonderful blog

I am going to assume you already know how to embed an image from Picasa

OK - just in case you don't know that - here is a quick 'how to' lesson

  • Upload your images to picasa (if you don't know about picasa, let me know and I'll add more information)
  • Click on the image you want (it will fill most of the screen)
  • Look for the words "link to this photo" at the right and click on them
  • This will open a menu of options - you want to copy the information (HTML code) below the words "embed image" (control 'C')
  • Paste that code into your blog as you are creating it. It will look like nonsense but when you publish, it will turn into your Picasa image.

Image Sizes

When you embed an image from picasa you have a choice of sizes and whether or not to include the album link (I never do). Unfortunately, the only sizes they allow are thumbnail (144 px), small (288 px) medium (400 px), and large (800 px).

Why the jump from 400 to 800???

I have no idea

Medium 400 px is fine for a normal blog layout. But if you want to emphasize photos rather the text, it's nice to use a stretched layout in Blogger so that nice big photos can be displayed. However, the large photos are just a bit too big at 800 px. The perfect size would be 600 px - but how do we get that?

It's not too difficult

All you have to do is type this:

width=600

and make sure it is in the correct place

When you past the HTML code into your blog from Picasa it looks something like this.


Look carefully and you will see a section in quotes - that is the address of the image. It finishes here with _MG_2235.jpg"

After the ending of the final quote, you can add extra information about image size

That is where you type those magic letters - width=600 - so your code will now look like this:


Be sure to type it with no spaces - after the final quote and before the forward slash. I always keep a space on either side of the text but I'm not sure that is necessary.

That's all!


When you publish the blog or click back and forth between 'Edit Html' and 'Compose' you will see your perfectly sized image in place of the code.

If you want to move the image, just cut and paste the code.

Friday, February 13, 2009

Sharing PowerPoint presentations online

I was asked recently how to share put a PowerPoint presentation on the web.

I have not been terribly successful doing that, so I will explore a few ways and post about them here, with more information coming in the future.

First and easiest, in my opinion, is to save the presentation as a movie ('file', 'save as movie'). I need to learn more about how to tweak the timing and other settings. There is an option to include music (go to 'movie options' in the 'save as movie menu). Then the powerpoint movie can be uploaded to google video or direct to blogger. This creates a self playing slideshow out of the slides.

Another option is Google docs. That fine service now supports PowerPoint files - but only in the .ppt format, not the new .pptx. So the files need to be saved as .ppt.

I don't yet know about all the options. The one I tested is manually advanced slide by slide.

Here is an embeddeded test slideshow I just uploaded through google docs.


Google Docs is a great service for hosting and sharing text, spreadsheet, and presentation documents.

Tuesday, November 11, 2008

Comparing slideshow hosting

I have used four services to host slideshows and thought I would do a comparison here between Picasa, Flickr, Smugmug, and Smilebox

Picasa


Pros
  • easy to use
  • lots of free storage

Cons
  • can't view full screen - clicking on the slideshow leads to the picasa site
  • even in picasa, images are smallish

Flickr


Pros:
  • easy to upload
  • easy to organize photos within the site
  • nice full screen option

Cons:
  • free version didn't allow me to upload all my photos
  • I couldn't figure out how to upload lower res (but it might be available)

Smugmug

Click here to link to full screen version


Pros:
  • nice filmstrip interface

Cons:
  • extremely hard to figure out how to embed slideshow
  • couldn't figure out how to allow full screen version
  • odd blank space in blog post
  • clicking on photo takes you to smugmug opening screen - very strange


Smilebox


Click to play Maracas Waterfall
Create your own slideshow - Powered by Smilebox
Make a Smilebox slideshow


Pros:
  • music
  • full screen option
  • lots of style options (most of them are irritating)

Cons
  • Hate it!!! - they constantly ask for pro sign up (=spend money) and the program hijacked my computer and added all kinds of stuff and I'm still not sure I got rid of it.
  • huge con - no way to show all of photos with vertical orientation
  • very difficult to work within their programs
  • irritating constant asking to buy pro version
  • ads in free version
  • full screen takes you to new website

Bottom line
My favorite - Flickr, but I need to pay for a pro account.

Comparing photo hosting services

I have been playing around with picasa, flickr, and smugmug trying to decide which is best. Last time I looked it seemed like flickr photos were duller in color so I thought I would do a test here. I will embed the same photo from each service so we can compare.

Picasa


Flickr
pink

Smugmug


Interesting - picasa photos have more color intensity, don't you think? Flickr and Smugmug seem about the same.

Monday, January 21, 2008

Keeping up with all those blogs using RSS feeds


RSS feed - why would I want that?


We have talked about blogging for quite a while. Now - how are you going to keep up with all of the exiting new blogs you and your friends are creating?

Here's what I do:
Many blogs and websites have an option that allows you to be notified when new content is added. Blogger has a nice built in feature labeled "Subscribe to: Posts (Atom)". Scroll to the bottom of this page and you will see it. This is an RSS feed - which means... "Really Simple Syndication" which means..."Web feed formats used to publish frequently updated content such as blog entries, news headlines or podcasts" (quoted from Wikipedia) which means (in simple terms)... you can be notified when something is added to your favorite blogs such as a brand new Granny Tech lesson!

The easiest way to keep up with your blogs:

Have 'feeds' sent to your iGoogle homepage (see my earlier post on setting up iGoogle). You can set up a new dedicated iGoogle page labeled 'blogs', or add the feeds to your main page.
  1. Start out by opening up the page you want to use in iGoogle.
  2. Next, open the blog you want to track in a different tab or window. If it is a 'Blogger' blog you can click on "Subscribe to: Posts (Atom)" at the bottom of the page. You will be given a choice: 'add to Google homepage' or 'add to Google reader'.
  3. Choose the homepage option. A new gadget listing the latest blog posts will appear.
  4. Other types of blogs or websites often have RSS feed options at the bottom of the page that can be added in a similar manner.
An example:
I really like Time magazine. I used to read it cover to cover every week before moving to Trinidad. Now I subscribe to the RSS feed instead. Here is how to do that:
  • Open up the Time website
  • Scroll to the bottom of the page
  • You will see this:


(click on image to enlarge)


  • Just click on either of the RSS link options: 'get Time RSS feeds' or 'RSS feeds (at the very bottom).
  • You will be given a number of topic options. Select and click on the one you want (I like 'Top Stories') and then click 'add to Google'.

Voila - you are up to date with the latest news!

Sunday, September 30, 2007

Blogging - misc

Here are a few final thoughts on blogging:

Permissions

You can set up your blog to be available to the public or to only those you invite. The default setting is pubic. I don't mind public (so far) and it is nice for my family and friends to be able to visit without entering a password. If I get some strange comments, that may change. To change permissions click on the 'settings' tab and then 'permissions'.

Hyperlinks

You may be tempted to skip this but - hyperlinks can be fun. So try one! Suppose you found an exciting website or online picture or recipe that you just had to share with everyone. You can set it up so that your friends just need to click here to see it (click on the word 'here'). I did that by inserting a link. Here is what you do:

Open the website that you want to link and copy the URL address at the top of the window (highlight it and click 'edit' 'copy' or control C)

Go back to your post and edit it (read my last post if you don't know how to edit). Now highlight the text you want to use as a link

Click on the link icon at the top of your window (the green one with a chain link on it - to the right of the T)

A window will appear asking you to paste in the URL

Voila! all is done

Your friends are dazzled with your expertise.

Sharing your blog

Now that you have created the perfect blog, you need to share it. The easiest way is to open your blog, copy the URL address, and then paste it into a grand email announcement.

Blogging - editing

No matter how careful you are in creating a post, when you look at the finished product, there is always some tweeking to do. For some reason, I haven't found a quick and easy 1 click path to edit a post - but I have found a tortuous multi click route. Please let me know if you find a better way. Here is what you do:


Click on the word 'customize' in the upper right of your window. In the new screen that appears, click on the tab at the top left that says 'posting' (be patient, it may take a minute for the screens to change). Then click on 'edit posts' (just below the tabs). Then click on the word 'edit' opposite the post you want to adjust. Then you can go in, fix anything, and republish.

I don't know of any way to rearrange your posts - the only option is to delete and put them back in the order you want.

You can play around with the look of your blog under the 'templates' tab. I recommend you do some exploratory clicking.

New Info!

I just found a way to do quick edits. You may need to set it up in your 'settings'. To find out how, click here. When it is set up a little picture of a pencil appears at the bottom of each blog. Just click on it to go to the editing mode. Now - why didn't I notice that earlier???

Blogging - adding pictures

To add pictures to your post, just click on the picture icon at the top of the window.


It will take you to a new window that looks like this:


Generally you will be adding an image from your computer. If you want one from the web, just open it in a new browser window, copy the address at the top of the screen, and past it into the window marked URL. To upload an image from your computer, click on browse and find it in your hard drive. Of course, it helps if your computer files are obsessively organized - maybe I will make a post on that sometime soon. Once you have located your image, you can choose the size and location. Then click on 'upload image' and just wait until it is done.

Next, return to your post and see how things look. This is when I have some difficulties. It seems that the uploader drops the image in wherever it wants - usually at the beginning of the post. It is possible to move images around but I have not found a way to do it with precision. Just click on the image so that little white squares appear in the corners and a black outline appears around the image. Then you can drag it around (I assume you now how to drag and drop - if not - let me know). It may take a few tries to get it to move where you want in relation to the text. You can also resize the image by dragging the corners. Hold down the shift key while resizing to maintain the image proportions. Sometimes smaller images are easier to move.

One more tip - you can upload multiple images at once (I think up to 5 or 6) by clicking on 'add another image'.

Blogging - getting started

My daughter, Jennifer, is setting up her first blog and asked for some help. So - I will take you step by step through settting up, posting, and editing a blog.

First of all - what is a blog?

I don't quite know how to describe it - maybe that is because blogs are so flexible. The name, I believe, comes from 'web log'. Blogs can be anything you want. They are a means to share text, photos, and video online. Many people use them as a kind of personal newsletter and they often have specific themes. Some are quite popular and have even 'shaped the course of human events.' In our family we use blogs to share news and photos. At first we had one extended family blog called Robisonshare. Right now we are setting up a blog for each of our five children (4 of whom are married with children of their own). This will make it better for our children to share their blogs with their inlaw family and friends without forcing them to wade through pictures of every Robison family event. My husband has a number of blogs set up. One of my favorites is his Family Home Evening Blog with stories and lessons for our children to share with our grandchildren. I have a personal blog plus Granny Tech.

Setting up a blog


Here is where I repeat my disclaimer - I am not an expert! In fact, I am a novice when it comes to blogging. I can get you set up with some basics, but we will be learning together. That said, the best place to get help is in Blogger help. To get there click on the 'B'ish looking icon at the upper left of your blog window and then on 'help' in the upper right. I highly recommend you browse through their help center.

Now - here are my thoughts on blogging

There are a number of services on the web that host and help create blogs for free. Since I am such a fan of Google, I use their blogging service called Blogger. To sign up for and create a blog, click on this link. You must have a google account in order to use this service. If you use Gmail, you already have an account. You will be guided through the simple process of selecting a title and an address for your blog. The final step is to select a template. Just pick one - you can always change it later.

Creating a Post


Once your blog is set up, click on 'start posting'. Then, you need to give your post a title and - start writing! You can insert photos, video, and links into your blog by clicking on the appropriate buttons at the top of the window. Since you will often want to add photos, I'll take you through that process in the my next post. When you have everything just right - click on 'publish post'. You can always make changes later - I'll guess I need to make a post on editing too.

Now that you are an expert, add more posts by clicking on 'new post' in the upper right part of your blog window.