Wednesday, December 26, 2007

So - what kind of video can I put on my blog?

You are limited by file size. To use the methods described below, the limit is (I believe) 100 MB. You should be able to post any of those little compressed video clips that your digital still camera takes with no problem. If you have regular video footage from a digital camcorder or a bunch of photos made into a slideshow, you may have to compress.

The only method I am familiar with to compress video is Apple's imovie program. That is what I use to make photo slideshows and to edit videos (there is a PC program called Moviemaker that, I expect, does the same thing). The end result is a very large file but it can be compressed. Here is what you do:

Create your movie

Select 'Share', 'Quicktime


Then select 'Web Streaming'


Click 'Save'. Your video should be compressed to a usable size that can be uploaded to your blog.

Uploading video to Blogger - 2 choices

The first choice is by far the easiest but I have had error problems with it occasionally. I will share that method first and then a slightly more complex but more stable method. Extremely large videos will not upload. I believe that Google Video uploads must be less than 100 MB. If you want to know how to created smaller video files - I will handle that in the next post.

Blogger

I used this to post the Grace Christmas song video below.

If you have not blogged before, review my earlier postings on blogging. To upload video just click on the little film icon at the top of your new post window (second from right - next to the eraser). It will take you through the stops of browsing your hard drive to find the video and then uploading. You can add text you post and - you are done! Very easy.

Google Video


I used this to post the Tessa Christmas song video below.
Go to the Google video website by clicking here

You will see a page that looks like this:


Click on 'upload videos' on the upper right under 'my videos'. This will open up a screen that walks you through the steps to find and label your video. Youe video will appear on the web for all to see. If you don't want this, select 'unlisted'.

When the upload is completed (may take a while) go to 'See all your uploaded videos' and view your video on Google Video. You will see a screen like this:


Now you need to get the html code to add to your blog. I know - this sounds complicated - but, trust me, it's not. Click on the blue 'Email-Embed' button at the top right of the screen. Then click on 'Embed Html'. This brings up the Html code into the small window below. This will tell Blogger where to find your video. You need to copy this code (highlight it and then control C) and then go to the new post in blogger where you want to put your video. Click the tab at the top that says 'Edit Html'. You will see any text you have entered thus far. Just put the cursor in the spot where you want the video to go and paste the code (control V). Go back to compose view by clicking on the 'compose' tab and you will see your video and can continue adding text and images.

One note - this pasting of Html code showed me a trick that overcomes one of my biggest problems with Blogger. It has been so hard for me to get pictures where I want them. I resize and drag but the window is so small and the pictures seem to jump all over the place. What I discovered is that you can switch to Html view, find the code for your picture (based on location in relation to text - it is the long string of unintelligible text), cut (highlight and control X) it, and then paste it where you want it - so nice!

Using Bloggers upload tool

I successfully added the previous Tessa video using Google Video and pasting the HTML into my post. This was not at all hard but involves a number of steps. I will now try using Blogger's built in video uploader. I have tried it in the past with no success.

Grace's Christmas song:


It worked! So there are two ways to add video. You can decide.

Adding video to your blog

Jenny is working on her family Christmas video. She is quite good at editing, creating, and burning her creations but she says getting it on to the web for me to see (I live 1000s of miles away) is tricky. So - I thought I would share some ideas here. I have only posted video a few times so this may not be the most streamlined method. Please add comments or email me about better ideas.

Here is a test - just to see if what I tried works.

Tessa's Christmas song:

Wednesday, October 24, 2007

Excel - why use it?

A few family members are trying to be more organized with their finances. This has motivated me to share a few tips on using Excel. I think Excel is one of my very favorite computer programs. I didn't know much about it until taking a statistics class when I was doing my PhD work at BYU. The instructor used Excel as a pedagogical tool - we learned statistics by doing things in Excel. He strongly suggested we all learn the program so I buckled down and spent some time playing around in the program with frequent consultations to the help menu. I think I also bought a book on Excel. Since then I have used it for many many things:
  • finance (0f course)
  • contact information for groups of people
  • my calendar (really!)
  • to do list
  • data I keep for the mission
  • creating nifty charts and graphs
  • and so on and so on
I will post some how to info on Excel very soon.

Here are a few samples of spreadsheets I use:
  1. Mission Schedule
  2. Getting Things Done to do list
  3. Personal Finance Template


Sunday, September 30, 2007

Blogging - misc

Here are a few final thoughts on blogging:

Permissions

You can set up your blog to be available to the public or to only those you invite. The default setting is pubic. I don't mind public (so far) and it is nice for my family and friends to be able to visit without entering a password. If I get some strange comments, that may change. To change permissions click on the 'settings' tab and then 'permissions'.

Hyperlinks

You may be tempted to skip this but - hyperlinks can be fun. So try one! Suppose you found an exciting website or online picture or recipe that you just had to share with everyone. You can set it up so that your friends just need to click here to see it (click on the word 'here'). I did that by inserting a link. Here is what you do:

Open the website that you want to link and copy the URL address at the top of the window (highlight it and click 'edit' 'copy' or control C)

Go back to your post and edit it (read my last post if you don't know how to edit). Now highlight the text you want to use as a link

Click on the link icon at the top of your window (the green one with a chain link on it - to the right of the T)

A window will appear asking you to paste in the URL

Voila! all is done

Your friends are dazzled with your expertise.

Sharing your blog

Now that you have created the perfect blog, you need to share it. The easiest way is to open your blog, copy the URL address, and then paste it into a grand email announcement.

Blogging - editing

No matter how careful you are in creating a post, when you look at the finished product, there is always some tweeking to do. For some reason, I haven't found a quick and easy 1 click path to edit a post - but I have found a tortuous multi click route. Please let me know if you find a better way. Here is what you do:


Click on the word 'customize' in the upper right of your window. In the new screen that appears, click on the tab at the top left that says 'posting' (be patient, it may take a minute for the screens to change). Then click on 'edit posts' (just below the tabs). Then click on the word 'edit' opposite the post you want to adjust. Then you can go in, fix anything, and republish.

I don't know of any way to rearrange your posts - the only option is to delete and put them back in the order you want.

You can play around with the look of your blog under the 'templates' tab. I recommend you do some exploratory clicking.

New Info!

I just found a way to do quick edits. You may need to set it up in your 'settings'. To find out how, click here. When it is set up a little picture of a pencil appears at the bottom of each blog. Just click on it to go to the editing mode. Now - why didn't I notice that earlier???

Blogging - adding pictures

To add pictures to your post, just click on the picture icon at the top of the window.


It will take you to a new window that looks like this:


Generally you will be adding an image from your computer. If you want one from the web, just open it in a new browser window, copy the address at the top of the screen, and past it into the window marked URL. To upload an image from your computer, click on browse and find it in your hard drive. Of course, it helps if your computer files are obsessively organized - maybe I will make a post on that sometime soon. Once you have located your image, you can choose the size and location. Then click on 'upload image' and just wait until it is done.

Next, return to your post and see how things look. This is when I have some difficulties. It seems that the uploader drops the image in wherever it wants - usually at the beginning of the post. It is possible to move images around but I have not found a way to do it with precision. Just click on the image so that little white squares appear in the corners and a black outline appears around the image. Then you can drag it around (I assume you now how to drag and drop - if not - let me know). It may take a few tries to get it to move where you want in relation to the text. You can also resize the image by dragging the corners. Hold down the shift key while resizing to maintain the image proportions. Sometimes smaller images are easier to move.

One more tip - you can upload multiple images at once (I think up to 5 or 6) by clicking on 'add another image'.

Blogging - getting started

My daughter, Jennifer, is setting up her first blog and asked for some help. So - I will take you step by step through settting up, posting, and editing a blog.

First of all - what is a blog?

I don't quite know how to describe it - maybe that is because blogs are so flexible. The name, I believe, comes from 'web log'. Blogs can be anything you want. They are a means to share text, photos, and video online. Many people use them as a kind of personal newsletter and they often have specific themes. Some are quite popular and have even 'shaped the course of human events.' In our family we use blogs to share news and photos. At first we had one extended family blog called Robisonshare. Right now we are setting up a blog for each of our five children (4 of whom are married with children of their own). This will make it better for our children to share their blogs with their inlaw family and friends without forcing them to wade through pictures of every Robison family event. My husband has a number of blogs set up. One of my favorites is his Family Home Evening Blog with stories and lessons for our children to share with our grandchildren. I have a personal blog plus Granny Tech.

Setting up a blog


Here is where I repeat my disclaimer - I am not an expert! In fact, I am a novice when it comes to blogging. I can get you set up with some basics, but we will be learning together. That said, the best place to get help is in Blogger help. To get there click on the 'B'ish looking icon at the upper left of your blog window and then on 'help' in the upper right. I highly recommend you browse through their help center.

Now - here are my thoughts on blogging

There are a number of services on the web that host and help create blogs for free. Since I am such a fan of Google, I use their blogging service called Blogger. To sign up for and create a blog, click on this 
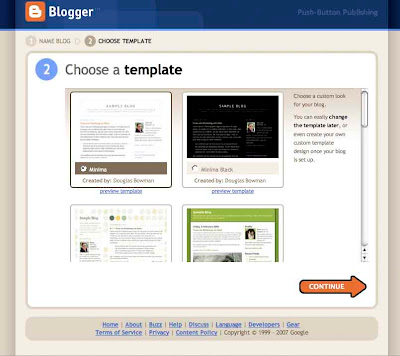
link. You must have a google account in order to use this service. If you use Gmail, you already have an account. You will be guided through the simple process of selecting a title and an address for your blog. The final step is to select a template. Just pick one - you can always change it later.

Creating a Post


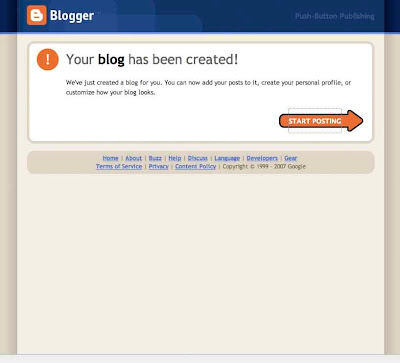
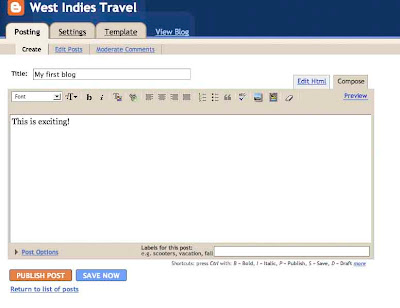
Once your blog is set up, click on 'start posting'. Then, you need to give your post a title and - start writing! You can insert photos, video, and links into your blog by clicking on the appropriate buttons at the top of the window. Since you will often want to add photos, I'll take you through that process in the my next post. When you have everything just right - click on 'publish post'. You can always make changes later - I'll guess I need to make a post on editing too.

Now that you are an expert, add more posts by clicking on 'new post' in the upper right part of your blog window.

Saturday, September 29, 2007

Questions?

Do you have questions? I would be happy to respond to them in this blog. Let me know what computer issues you are struggling with by adding a comment to this post (click on the word 'comments' at the bottom of this post). I plan, when time allows, to add posts about saving and emailing photos (picasa), making a homepage (igoogle), making your own blog (blogger), downloading free audio (itunes), and other tools that I have come across that help me have fun and be productive.

Gmail

I love Gmail!

Gmail is free!

It has certain limitations - mainly that messages can only be read and composed while your computer is connected to the internet. But the free storage and the search capacity are amazing. I actually have a number of accounts. I have my main one as well as a secondary one that I use for all online purchases and registrations. That one fills up constantly with junk mail but I only check it every few weeks. This keeps my main account nice and clean. I have also created accounts for special purposes when I knew I would be collecting lots of messages with hefty attachments (for some of my research projects). I keep a careful record of all Gmail account names and passwords on a Word document stored in my computer in a folder called, not surprisingly, 'computer info'.

If you don't have a Gmail account click here (just click on the word 'here') to sign up.

There are lots of things you can do with Gmail. Here are a few of my favorites:

Search


If you are trying to find an email just recall a word or two from it and type them into the search window. Then hit return or click on 'Search Mail'. A list of messages containing those words will appear. You can also search by a person's name if you want a quick way to find their emails.

Labels


Labels are kind of like file folders. Imagine setting up a file for certain emails you may want to access later. You can do that by creating labels. The nice thing about labels as opposed to folders is that you can put the same email into multiple imaginary folders by giving it more than one label. Because of the great search capacity in Gmail, you don't need to give every message a label. Just think about what groups of emails you may want to retrieve. You can see (above) the current labels I have in my Gmail - or maybe you can't - the image is very small. I am currently using: Computer info, Family stories, Fun(ny), Medical, Mission ideas, and Mission Stories. I expect my label list will grow as time goes on.

It is easy to create and apply labels.


To get started just select a message you want to label by clicking in the little white box to the left of the sender's name. A checkmark will appear. Then click on the tiny downward facing arrow to the right of the window near the top of your screen that says 'more actions'. A drop down menu will appear. Click on 'new label' and type in a title for that label. The label will automatically be applied to the message you selected and in the future it will appear as a label in your 'more actions' menu. Later, when you have another message you want to label. Just select the message, click on 'more actions' and then click on the label title. It is also possible to remove labels and edit them. The Gmail help link (upper right hand corner) is a great place to learn more.

Have fun searching and organizing!