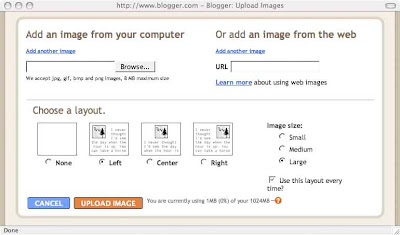
It will take you to a new window that looks like this:

Generally you will be adding an image from your computer. If you want one from the web, just open it in a new browser window, copy the address at the top of the screen, and past it into the window marked URL. To upload an image from your computer, click on browse and find it in your hard drive. Of course, it helps if your computer files are obsessively organized - maybe I will make a post on that sometime soon. Once you have located your image, you can choose the size and location. Then click on 'upload image' and just wait until it is done.
Next, return to your post and see how things look. This is when I have some difficulties. It seems that the uploader drops the image in wherever it wants - usually at the beginning of the post. It is possible to move images around but I have not found a way to do it with precision. Just click on the image so that little white squares appear in the corners and a black outline appears around the image. Then you can drag it around (I assume you now how to drag and drop - if not - let me know). It may take a few tries to get it to move where you want in relation to the text. You can also resize the image by dragging the corners. Hold down the shift key while resizing to maintain the image proportions. Sometimes smaller images are easier to move.
One more tip - you can upload multiple images at once (I think up to 5 or 6) by clicking on 'add another image'.

No comments:
Post a Comment